

Split Level Entry Remodel – Before and After Tips to Modernize Your Foyer in 2025
Article may have affiliate links. If you make a purchase, I may earn a tiny commission at no extra cost to you. Big thanks for supporting my small business.

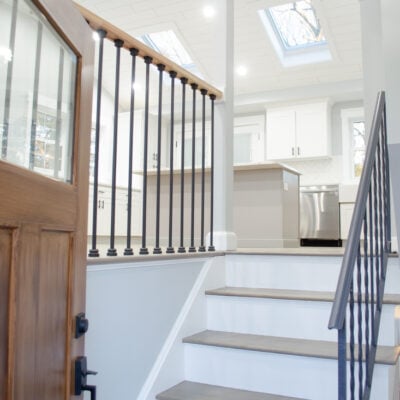
Updating a split level entry is one of the fastest ways to modernize your home’s first impression without changing the entire floor plan. Ours started dark and boxed-in with a half wall, tiny door and not much light. A few weekend-friendly updates completely changed it!
Quick Fixes for a Split Level Foyer:
- Swap the half wall for open railings with modern balusters
- Install a wider front door with sidelights for natural light
- Paint risers white + stain treads darker for contrast
- Brighten the ceiling (vault where possible or add shiplap/paint)
- Add a slim bench/hooks to maximize small-space storage

We considered a few different finishes for the balusters—white, wood-toned, even a brushed metal but matte black won for the contrast and clean lines.
AND…. hollow metal balusters cut easily and keep costs down compared to solid!
Modern Split Level Entryway Ideas
Traditional split-level homes usually greet you with half walls and shadowy corners. Ours had all that and a front door that barely let in light. No wonder it felt like a cave!

Here’s exactly what we did to open it up:
- Swapped the half wall for open railings — instantly doubles the sightline from entry to living room.
- Used sleek black metal balusters — spaced under 4″ apart (many towns require <4″ sphere spacing so be sure to check your local code).
- Installed a wider front door with sidelights — our unit added 12″ of glass so daylight hits the stairs.
- Added shiplap and increased headroom — even a few extra inches of ceiling height makes a small foyer breathe.
Before, it felt tight and outdated.

Now?
Morning light pours in and you can see straight to the kitchen island from the door. It finally feels open, not boxed in.

Our Favorite Stair Railing Kits
| Product | Best For | Cost | Link |
|---|---|---|---|
| Amazon Black Metal Balusters (hollow) | Modern, budget-friendly look; cut easily | $$ | Shop Here |
| Oak Square Handrail | Classic farmhouse feel; pairs with metal balusters | $$ | Shop Here |
| Baluster Shoes | Cleaner finished look; hides minor drill chips | $ | Shop Here |
Tip: Hollow metal balusters are cheaper than solid and easier to cut. If you skip shoes, drill slowly to avoid chips.
Step-by-Step: How We Remodeled Our Split Foyer Staircase
Step 1: Remove the Half Wall
This opened the sightline and gave the entry breathing room. We checked first to confirm there was no wiring in the wall (peek from the basement if you can).
The demo was pretty straightforward.

Step 2: Drill Holes for the Balusters
We spaced ours every 4″ along the handrail and floor.
Most codes limit spacing to 4″ max but always check your local code.

Step 3: Cut Balusters and Add the Handrail
We cut the hollow black metal balusters to fit and dry-fit to a finished rail height of roughly 36–38″ (confirm your local requirement).

Step 4: Secure with Adhesive
We used construction adhesive (Loctite PL) to lock each baluster.
Set, wipe squeeze-out, and allow cure time per the tube to prevent squeaks or shifting.

Step 5: Install the Rail
A chop saw cuts hollow balusters cleanly.
Two people make alignment faster and be sure to use painter’s tape or a stick to keep spacing consistent as you set the rail.

This part needs two people.

Aligning the rail and setting each baluster takes teamwork (and a bit of patience).

DIY Staircase Supplies & Links
We used budget-friendly materials that still deliver a high-end look:
- Oak square handrail — classic profile that pairs well with metal balusters
- Black metal balusters (hollow) — affordable and easy to cut
- Baluster shoes — hide tiny chips and finish the look
- Pendant/flush light — choose low-profile near door swings
Shop the Look: See more in my Amazon storefront (I grouped foyer/stair parts in one place).

Split Level Entry Remodel Before and After (Photos!)
Swapping the door, brightening paint, and refreshing floors made the whole first level feel new. Paint notes:
- Walls: Behr Platinum — reads cool in morning light, neutral with wood tones
- Trim/Risers: Behr Bright White — crisp next to darker stair treads

Here’s another look at the entryway before:

We kept the original iron railing on the other side of the staircase and painted it black to tie everything together.


Common Questions
Usually, yes. First confirm it’s not load-bearing and doesn’t contain wiring or HVAC. We peeked from the basement and opened a small access to check before demo.
Requirements vary by city. Cosmetic swaps often don’t, but structural changes (new rail height, moving posts, widening openings) and new doors typically do—always check with your local building department.
Our stair rail portion took about 3 hours with two people. Add time for demo, paint/stain, and door installation—ours was a full weekend including dry times.
Absolutely. Opening the sightline, adding glass at the door, and brightening finishes make the entry feel larger, more welcoming, and typically improve resale appeal.
Ready to Remodel Your Entry?
Start with the half wall—it’s the fastest visual win in most split levels. Then consider a wider door with sidelights if you need more natural light. For step-by-step door details, see how we widened our split level front door.
How to Remodel a Split Level Entryway
Equipment
- 1 Reciprocating saw
- 1 Hammer or mallet
- 1 Chop Saw
- 1 1 inch paddle drill bit
Supply List
- 1 piece Square oak handrail
- 20 Black metal balusters
- 40 Baluster shoes
- 1 tube Loctite
Instructions : Step by Step
Remove the half wall
- Check for electricity first. If you have any outlets, hire an electrician to safely relocate the wiring.
- Remove the dry wall and 2x4s with your power tools.
Add holes for staircase balusters and handrail
- Use a drill with a spade bit to create holes 4 inches apart on the floor and in the base of your new handrail.
Cut custom balusters to height
- Using your circular saw, cut your metal balusters to 3 feet tall (36 inches).
- If using baluster shoes, add them before installing.
Install balusters and handrail
- Fill the drilled holes and tops of the balusters with Loctite adhesive. Position the balusters into the holes and secure the handrail on top of the balusters.
- Remove any excess adhesive. Allow the glue to dry overnight before using.
Tips
- Paint the walls a bright, light color
- Install a pendant light
- Remove old carpet and install new vinyl plank flooring
- Replace the smaller front door with a larger one
Looking to see all of the home remodeling projects we did in this split level home? See them in order below.
Split Level Home Renovation Series
- Split level home remodeling project – how it all started and the home before we tore it apart
- Small 5×8 bathroom remodel with cost and how we saved money by keeping the same layout
- Kitchen demo + adding a load bearing beam between the living room, dining room and kitchen
- Split level kitchen renovation before and after (you will not even recognize it!)
- Kitchen cabinet review at the split level home and how we packed storage features into the new space
- Installing shiplap on the new vaulted ceiling in the kitchen and living room at the split level
- Opening up a load bearing wall in the kitchen
- Split level entry way foyer makeover (before and after)
- How to increase front door width and height – front door makeover
- Installing solid core interior doors for a modern look
- Split-level house exterior makeover before and after
- Why we picked black windows with white interior
- How to modernize a split level home exterior
- Finished basement vinyl floor plank installation
- Split level front door ideas
- BONUS – See another split level home that sold 80K over asking price

Meet Jessica
What started as a hobby, Jessica’s blog now has millions of people visit yearly and while many of the projects and posts look and sound perfect, life hasn’t always been easy. Read Jessica’s story and how overcoming death, divorce and dementia was one of her biggest life lessons to date.
Great remodel!! What color paint is the wall and trim, looks so bright and clean! Thank you… 🙂
Hi, thank you! The wall color is Platinum and trim is bright white by Behr
Looks awesome! Definitely open up the space!
Would love to see a blog post on how you decorated your split level foyer entryway! We have the exact same entry way set up and I’ve been struggling on functional aspects while still looking nice. Google and current searches aren’t giving me much!
It looks so good!!!! I love how bright and open it is. MY best friend in elementary had this exact layout, so popular back then 🙂
Love this design! Could you tell me the size of your trim that was used around your windows along with your baseboards and doors. Thank you!
sorry just seeing this. It’s a craftsman style trim 3-5″
Thanks so much for posing this! We remodeled our split level home using your idea. We love our new entry and open floorplan. We also added a large family room and deck off of the back. We changed the roof peak and added a front door peak. Love it!
wow that’s so cool!!! I would love to see some pictures if you want to email me at jessica (at) fourgenerationsoneroof (dot) com
Your house looks beautiful, but I have a question. We have a house with a similar floor plan. We took out the wall between the living room and kitchen, and our stairway originally had a black iron railing instead of a half wall. Well with the new open concept floor plan, we were struggling to find places to put the furniture and TV in the living room. We ended up building a half wall just to have a place for the entertainment center. My question for you is: where do you plan to place your living room furnishings? What are you going to put there, that looks good as you are coming up the stairs?
yes open concept is a trade off for traditional styling of furniture against a wall but honestly, the back of the sofa (pulled off the baluster wall) looks totally fine as you walk up the stairs 🙂 I don’t like the back of the sofa right up against the balusters so pulling it out a bit allows some room to breath and keep the balusters from looking cluttered as you walk up the stairs.
id love to see how furniture was.placed after this split level remodel. I have the same layout and I’m struggling to see how I’d lay it out. Also I’d love to know what the SQ footage of each room before the remodel was. although ours is set up the same it’s super tiny I think…. I’ve been trying to figure out how to remodel this home for 4 years now and I absolutely love this design I just don’t know if our space is big enough to justify sinking that kind of money into it…
Hi, sorry for the delay, your comment was in my spam box! We actually sold this house so I do not have an pictures of it with furniture but I would have put the back of a couch along the balusters but not right up against it (leave some breathing room) BUT if you have one sofa, I would put that in front of the window and put 2 small accent chairs in front of the balusters OR just one accent chair. Either way, I personally think the wall along the stairway looks better with balusters and is a huge improvement to any split if opening it up to a light and airy feel is what you are going after 🙂 I do have one-on-one consultations as well available if that is something you are interested in. You can book here https://stan.store/fourgenerationsoneroof/p/book-a-11-call-with-me-5z649
Beautiful remodel! I just purchased a home with a super similar layout in central Mass. Any chance you can share the construction company that did that kitchen/living room?
Looks great! I just purchased a property with a very similar floor plan in central Mass . Any chance you will share the construction company that did this job so I can reach out?
Jim did all of the work in this house, depending on what part of Mass you are in, he may have availability.
We’ve got approximately same house, and put a greenhouse off the entry with transom window! Is this now the kitchen dining room? You put the dining table to the left? Or where is the dining area? Is your living room now at the end of the hall? We actually airbnb out our downstairs, and so the area you see in this is our kitchen, dining and living room which is really kind of a squeeze, but it works out great for our purposes…
we actually eliminated the dining room in this house which allowed us to add a large island with buffet wall. The dining room is hardly used so it made sense for this house.
It looks beautiful! Hugs,
Beautiful job! Wondering what vinyl plank you used and the colour. Love all of it!
Thank you! The floors are real hardwood, not vinyl plank