

How to install vinyl plank flooring on concrete: Beginner Guide
Article may have affiliate links. If you make a purchase, I may earn a tiny commission at no extra cost to you. Big thanks for supporting my small business.


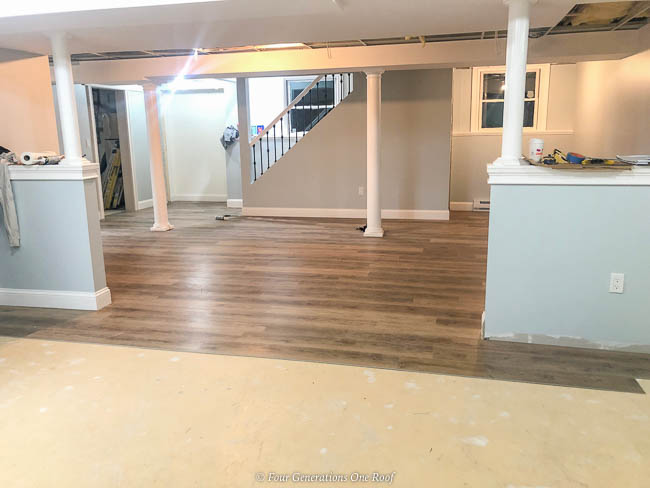
Installing floating vinyl plank flooring over concrete is an easy way to update a basement or any space in your home. Today I am sharing how to install vinyl plank flooring over concrete, the cost to install vinyl plank flooring and why we did not use an underlayment.
Installing vinyl plank flooring over concrete is a highly sought-after choice among homeowners due to its affordability. The combination of cost-effectiveness and the resilience it offers makes it a favored option. Moreover, its low maintenance requirements and a wide array of style choices further enhance its appeal, making it a top choice for flooring installations.
Vinyl Flooring Installation
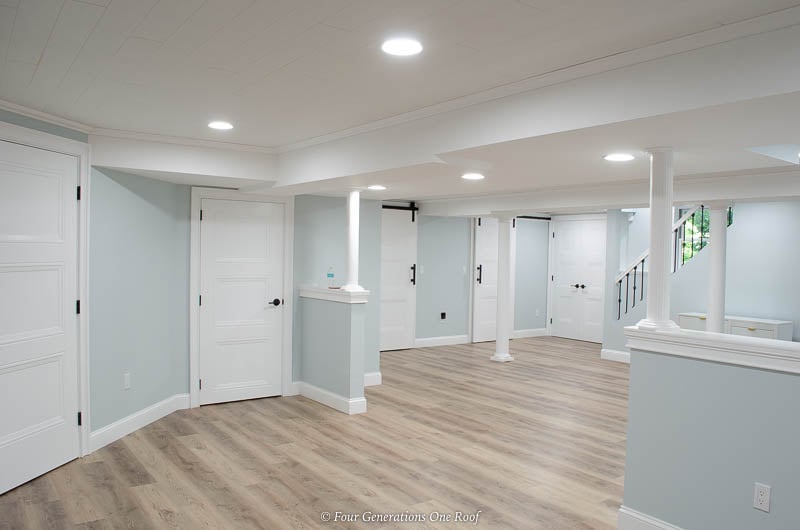
Ok! Lets take a look at how to install vinyl flooring on concrete basement floor and see our amazing basement makeover. Our flooring is from Select Surfaces and was purchased online from Sam’s Club. I’ll share a group of links below in case you are interested in purchasing.
The vinyl plank flooring installation method is easy and a great way to refresh a basement. Not only are the vinyl planks we used waterproof, they are gorgeous and can float!
What do I mean by float? There are several installation methods when it comes to flooring. Some flooring can be glued, stapled, nailed or the floating floor method.
The floating floor method is a great choice for a concrete floor in a basement.
Vinyl plank flooring is a great flooring solution for kitchens, baths and basements or any high traffic area.

Our basement remodel started as a partially finished space with boring cold concrete as the floor. One of the biggest reasons why we picked vinyl plank flooring was because it could be installed directly over the concrete.

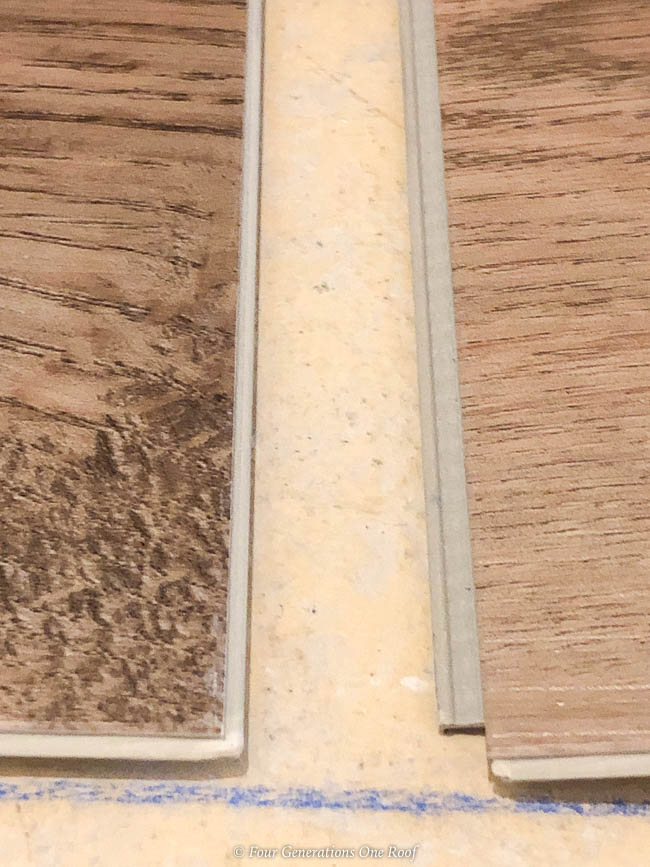
Vinyl Flooring Installation Click Method
The flooring we picked clicks together like tongue and groove and requires no glue.
The vinyl click lock flooring system is easy peasy!

Vinyl plank flooring has several features and benefits including:
- Attached Foam Backer which means you do not need to install an additional underlayment
- Durable, it’s perfect for high traffic areas (dogs and kids!)
- Click Installation which requires no glue
- 100% waterproof which means it’s easy to clean and great for high moisture areas
- Resistant to stains
- FloorScore Certified
- 30 Year residential Warrant, 10 Year Commercial Warranty
FAQs about vinyl flooring
How to Install Vinyl Plank Flooring on Concrete
What to do before installing vinyl plank flooring?
Clean your floor! Make sure you vacuum and remove any debris that may be on the floor.
Remove any baseboard or trim molding from the wall.
Step 1: Start the first row vinyl plank flooring
First we started by snapping a chalk line to get a straight line. Just pick a starting point and go from there. We decided to start at the stairway wall.
You will notice that we did not have baseboard installed yet so if you have baseboard, be sure to remove before installing your vinyl flooring.

Step 2: Layout the Vinyl Flooring
Once you determine which direction you want you flooring installed, start clicking the floor pieces together starting on one end of the room and working your way around the space.
Installation Tip
We used a hammer and a scrap piece of wood to tap the flooring together. The scrap piece of wood will protect the edges of the flooring from the hammer.
Step 3: Cut Flooring & Stager Seams
Cutting the planks is as easy as cutting a line with a utility knife.
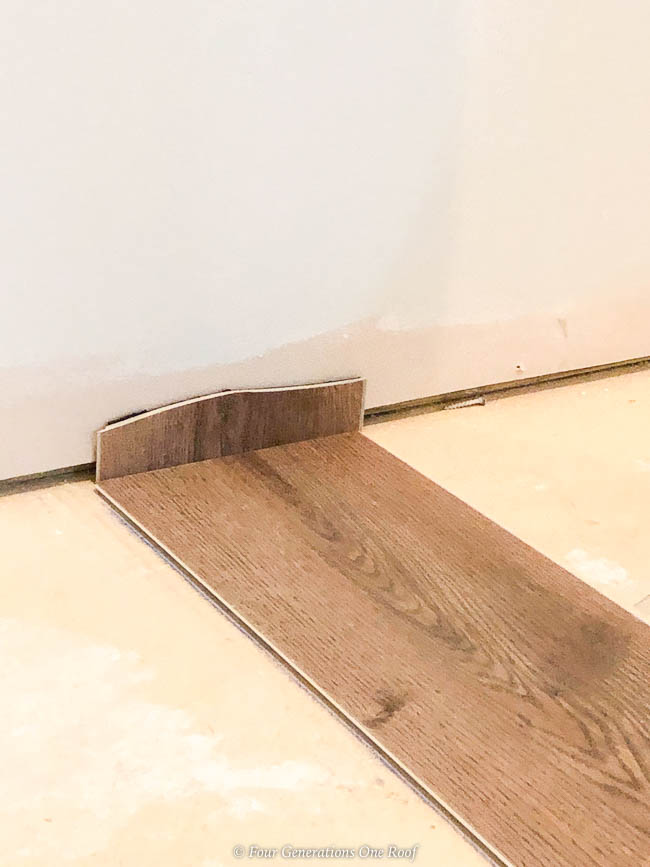
As you work your way around the room, you will need to cut the flooring to size as you abut the wall. Using a tape measure, determine the size of flooring needed and cut using a utility knife.
Be sure to stager the seams to create a more stable and aesthetically pleasing look.

Cutting vinyl plank flooring will require a sharp cutting tool or a chop saw. We used a utility knife and it was so simple!
Once you have cut the vinyl plank with a utility knife, simple fold over and snap off.

Step 4: Final Touches
Install transition strips or moldings along the edges of the room to cover expansion gaps and create a finished look. If you removed any baseboards prior to the installation, reinstall baseboards or trim.
Vinyl Plank Flooring Color Options
If a light warm toned brown isn’t your thing? They have a variety of colors and textures here. You can also see their Morning Fog color (gray flooring) that we installed in our split house basement (see flooring here). Yes! We did another full basement renovation and installed this same flooring over concrete at that house as well.
I almost went with the Harbor Gray color in an effort to create a coastal theme but opted for the warm toned brown instead.
The directions are very self explanatory. We used a piece of the flooring as our spacer against the wall. You will need a small gap between the wall and your floor to allow for expansion.
We picked Harvest Oak color and ordered directly from Sam’s Club and there was minimal shipping cost. The best part, the floor was delivered in 5 days! You also have the option to pick up in the store as well.

Here you can see Jim below playing air guitar with the shop vac. I think it was almost 8pm when I snapped this picture and he was on 13 hours of being in my basement and modeling for my social channels! -ha.
Needless to say, he was a little done with me at this point ;).
Do You Need Underlayment For Vinyl Plank Flooring?
We did not use an underlayment under our vinyl plank flooring. The back of the rigid core flooring has a rubber like backing that does provide a cushion. Depending on your flooring type you may or may not need underlayment. We did not use underlayment.
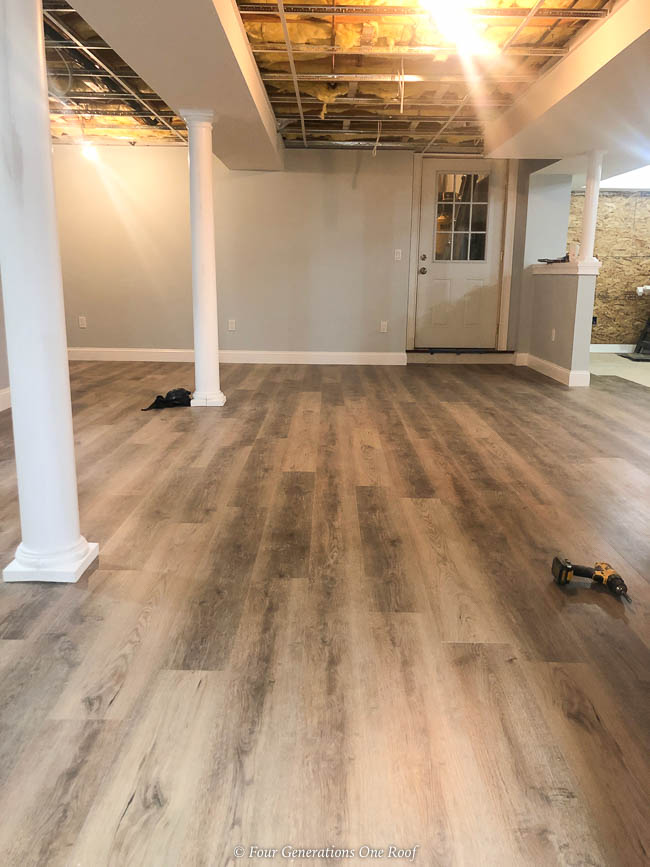
We finished about 1000 square feet in our basement so the time to lay the floor took a full day plus another 1/2 day but the overall process was so simple. If you are laying a floor in a smaller space, these vinyl planks would take no time to install.
Again, the directions that come with the vinyl flooring are so easy to follow. Basically, the Rigid Core vinyl plank floor floats on top of the concrete.
Besides choosing a floor for the basement that could easily be installed over cement, it was important that is was durable, easy to clean and looked like wood.
Which Direction To Lay Vinyl Plank Flooring?
We had a similar style vinyl plank flooring in our old house and we absolutely loved it so we decided to go with the same style, texture and feel this time around as well.
You can install vinyl plank flooring in either direction but we opted to run the plank flooring horizontal to mimic the same direction of the ceiling planks.
I changed my mind a few times on this but in the end, we decided to keep the flooring and ceiling planks going in the same direction.
How to Clean Vinyl Plank Flooring
How do I clean the vinyl plank flooring over concrete?
The plank flooring hides dirt well and also mops up easily. I can’t say enough about how amazing this floor is.
Hot water, a mop and Mr. Clean! As you know, we have lots of kids in and out of our house, dogs and lots of foot traffic.

For those of you wondering, the light blue/gray wall color is called Lullaby by Sherwin Williams. By far, the prettiest blue/gray wall color I have used in a while.
Want to see this floor completely installed? Click over to our basement makeover to view the entire floor complete. The before and after is pretty dramatic if I do say so myself!
How much does it cost to install 200 square feet of vinyl plank flooring?
This vinyl floor cost under $2.50 a square foot for materials and can easily be purchased on the Sam’s Club website. I placed my order and it was delivered a week later!
For example, if you had 200 square feet of space, this flooring would cost you $500 (200sf x $2.50 sq.ft), plus tax and shipping. So all in all, not bad! $2.50 a square foot is very reasonable for material cost especially with all the features and benefits it offers.
If you install the flooring yourself, you will save the labor cost. If you hire a professional, the installation costs are many times more than the cost of materials. Depending on where you live, labor rates vary.
Don’t miss these two other flooring installs featuring the same flooring in different colors below.
More Vinyl Plank Flooring Installation Projects You Will Love

See vinyl floor install at the Split Level Flip House
See vinyl floor install in our pool house

More Posts Basement Remodel You Will Love
- basement renovation project and why we decided to finish (day 1 of the renovation)
- how to frame walls in basement to create closets and storage space
- how to install vinyl plank flooring over concrete
- how to install shiplap ceiling in a basement with Armstrong ceiling planks
- how to install a shiplap accent wall with Armstrong planks
- Basement Makeover Before and After
How to Install Vinyl Plank Flooring (printable)

Supply List
- Vinyl Plank Flooring
Instructions : Step by Step
- Snap a chalk line to get a straight line
- Determine your layout and which direction the flooring will run
- Remove any baseboard
- Cut the planks with a utility knife
- Start installing the flooring at one end of the room by clicking together and tapping each board together with a hammer. Be sure to use a scrap piece of wood along the edge of wall as a spacer to allow for expansion
- Using a hammer and a scrap piece of flooring, tap each piece into each other using the scrap piece of wood in between the hammer and flooring. Do not tap the flooring directly with the hammer as you will break the edges.
- Once finished, re-install baseboard
Latest Blog Posts


Meet Jessica
What started as a hobby, Jessica’s blog now has millions of people visit yearly and while many of the projects and posts look and sound perfect, life hasn’t always been easy. Read Jessica’s story and how overcoming death, divorce and dementia was one of her biggest life lessons to date.
It looks really nice! Congratulations.
Stay well.
Thank you!
THIS FLOOR LOOKS GREAT AND I’M SURE IT DID CHANGE THE ENTIRE LOOK OF THE BASEMENT. LOVE WHAT YOU CHOSE!
Thank you! I am loving it too 🙂
I love what you did, it looks great! I do have a question regarding laying over cement, did you have to use cement leveler to smooth the floor? Or was your floor already level?
Thank you, we did not. Our floor was level
Did this project not require any trim or molding pieces for doorways or anything? I’m interested in purchasing some of this vinyl plank flooring but it looks like Select Surfaces doesn’t manufacture molding kits for their vinyl plank flooring, only for their laminate flooring.
We added our own base molding.
I was 68 when I laid vinyl flooring in the living room, dining room and hall. At 69, I did a bedroom which in now my office, and I did it all by myself!! Now at 70 I am starting on my bedrooms and have plans to do my basement. If I can do this, then anyone can and the care of this flooring is great. Have 4 dogs and it looks as nice as it did when I first put it down. Thanks!!!!
That is great !! It’s definitely a diy friendly floor and I love how easy it is to maintain.