

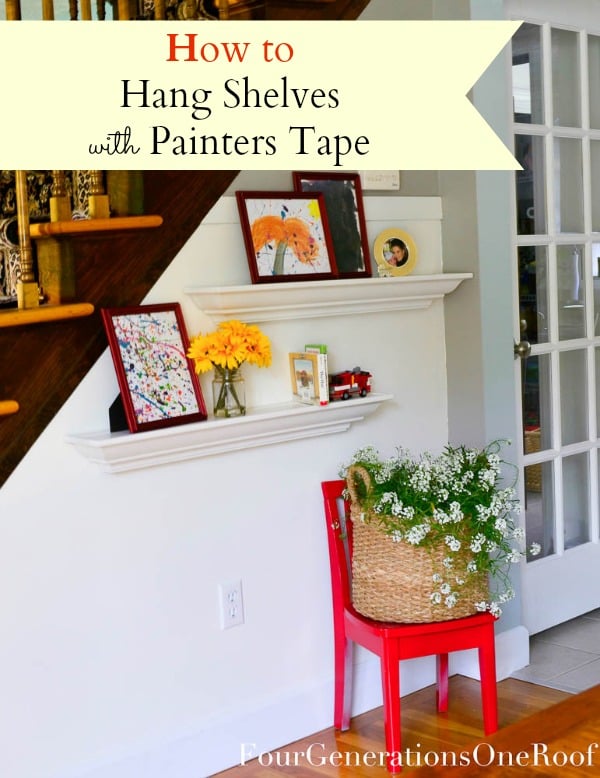
How to hang shelves using painters tape
Article may have affiliate links. If you make a purchase, I may earn a tiny commission at no extra cost to you. Big thanks for supporting my small business.
Looking for a simple and effective way to hang wall shelves? Look no further than this easy-to-follow guide on using painter’s tape to hang shelves. With just a level and a few basic tools, you can have beautiful floating shelves in no time!
My dad is a stickler for a measuring tape, using percentages, splitting the difference and doing all kinds of things that make my brain hurt when it comes to anything “carpentry” and measurement related.
Who does that in real life?
Certainly not me.
So I have a little method I use to hang things that don’t require a degree in math!
I am laughing right now because if Jim is reading this post, he is definitely rolling his eyes!
Easy Way to Hang Floating Shelves
Taping the bracket holes for wall shelf is an easy hack that can help ensure accurate placement on the wall.

All you need is a tape measure, some painters tape and you’re ready to start marking out where each shelf bracket should go. This simple trick can save time and energy when hanging shelves.
This is a project that I did a while back at our prior multigenerational house and I’ve used this method several times since!
Here is what the wall looked like before in our dining room.

Before I hung the shelf on the wall, I decided to add a piece of MDF 3/4 high.

I wanted to add a little interest to the wall along with the shelves.
How to Hang A Floating Shelf with Brackets
Purchase a shelf with brackets on the backside for hanging.
Hanging a shelf with brackets can be tricky to get the holes in the right spot.
A wall mount shelf will typically have brackets on the backside.

Add a piece of painters tape from one end of the bracket to the other and marked the bracket hole with a marker.

Place your tape (with the spots for your hole marked) on the wall and use a level to ensure the tape is straight.
Installation Tip
Place your tape (with the spots for your hole marked) on the wall and use a level to ensure the tape is straight.
Making sure your shelf is level is very important!
Nail a hole where you marked your spots and then remove the tape.
Use a stud finder to locate the wall studs if necessary.

Make sure your tape is level though, otherwise, your shelf will be crooked.
The next step, I screwed a dry wall screw in each hole that I made where my spots were marked.
I left about 1/4″ of the screw remaining so I could hang the shelf.
If your shelf doesn’t hang tightly against the wall, you need to fasten the “screw” in a little more. Be sure to use wall anchors if necessary.

Add a coat of paint and Viola, you have a display wall.
I decided to frame some of the kids artwork and add my son’s latest lego project.

If you would like to see more pictures of this room, be sure to check out our dining room makeover post as well as our board and batten tutorial on how to add MDF as a wall treatment.
These shelves are perfect for displaying your favorite handmade crafts and pictures, and they’re also incredibly affordable.
If you’re looking for a more modern look, we’ve got you covered with our tutorials on hanging glass shelves using “bingo brackets” or creating your own DIY shelf mantel.
Whether you’re a DIY enthusiast or just looking to spruce up your home, our shelf-hanging methods are sure to impress!
Easy “how to hang shelves” Hack
Supply List
- Shelves with brackets on backside
Instructions : Step by Step
- Choose a standard width for your shelves and use painter's tape to mark the exact width you want
- Use a level to ensure that the painter's tape is perfectly straightUse the painter's tape to create a guide for where to place your shelf brackets or hardware. This will help ensure that your shelves are level and in the correct position.
- Use a pencil to mark the exact location where you want to place your shelf brackets or hardware, using the painter's tape as a guide.
- Next place the shelf brackets or hardware directly over the pencil marks you made on the painter's tape and install hardware. This will ensure that your shelves are level and in the correct position, without the need for a measuring tape.
Tips
There are several ideas on how to put up a shelf but for me, this is the easiest! I know it’s not fancy but whether you are hanging a shelf on drywall or wood, this method works!
More recent posts


Meet Jessica
What started as a hobby, Jessica’s blog now has millions of people visit yearly and while many of the projects and posts look and sound perfect, life hasn’t always been easy. Read Jessica’s story and how overcoming death, divorce and dementia was one of her biggest life lessons to date.
This is a FABULOUS tip! One of those “now why didn’t I think of that!?” tips! Pinned, tweeted, & FB shared! 😉
I love that basket full of flowers on the red chair too!
What a great tip! I have NEVER done it this way….matter of fact a really did a job on our dining walls when I tried two hang my last two shelves! (Don’t worry, the hubby saved the day!). Thanks for sharing this. I can’t wait to try it!
Thank you 🙂
Jessica. Awesome. Thank you!!
thank you !
So smart! I love tips and tricks like this – thanks Jessica!
Thanks Lisa 🙂 Hope you are enjoying your summer!
Thanks so much for sharing! Can’t wait to try this out when I hang our bathroom shelves!
Thankyou Ashley!
Awesome tip! Can I just tell you that about a month ago, I hung one of these shelves in my office and measured twice before drilling thinking I had it all under control. I had marked a few points on the wall of where the edge of the shelf was and then where the holes would go. I have no idea how I messed it up but I wound up with a hole 1″ on either side of the shelf! LOL. I’ve hung these before and it never happened. Thankfully this room is not yet painted so I don’t mind patching.
I will definitely use this tip next time and save myself the time & headache! 😉
Oh I’ve been there and done that 🙁 Good luck !
I’ve seen this trick on Pinterest and I think it’s pretty brilliant! Love how you styled those shelves.
Thanks Maury!
wow! that looks awesome- so fresh and crisp, and LOVE the pop of red in the chair! so welcoming!
The little chair is my favorite 🙂
Awesome tip Jessica!! Thanks for sharing this! I am moving in a week, so this will really help me hang my shelves in our ‘new to us’ home! Liked this and shared it too! Hope you are having a fun weekend! Heather 🙂
Thanks so much Heather! Good luck with your move 🙂
Hi Jessica,
Wow, I was surprise to see how you made that little makeover.
It was nicely done and so simple.
Thank you for letting us know how you did it!
Cheers!
Thank you!
Great tip. I have pinned this on Pinterest. I have something right now that I need to hang with this type of bracket. This will really help and looks so easy.
Thank you and good luck with your project 🙂
Jessica -this is inspired! And it’s SO refreshing to find a blogger who writes beautifully AND knows the difference between ‘insure’ and ‘ensure.’
(I know, I know, picky, picky, picky…)
Love your blog!
Kay
Ha, thanks Kay!
Viola is a flower….
Voila is I think the French word that you wanted to use……
Just sayin.,……
This is such a neat idea!
I am always struggling with getting things straight when I hang them on the wall.
I will definitely try this!
Thank you LIsa!
wow! So simple and yet brilliant! I have been struggling with those little (expletive)’s for 28 years! Either I am really dense, or you are really bright! I suspect the latter 🙂 THANKS!!!!
Rachel
Ha ha, thanks Rachel! Good luck if you give it a try. Let me know if it works for you!
What a great tip. I’m the world’s worst at hanging shelves, pictures (especially ones with more than one hanger), etc. I will definitely use this!Thanks.
Thank you Susan! Yes, give it a try, it’s fool proof 🙂
I love it!! GREAT idea! Loving your blog, thank you for sharing so much!! Very inspiring too – I’m working on lightening up my little condo and your living room is my new inspiration! Hugs & Smiles, T
Thank you and good luck with your living room 🙂 I’m glad you found ours inspiring. You will be amazed at what some light colored paint will do for a room. Send over some pictures when you are done, I would love to see it. Happy New Year!
Oh, man! I wish I’d thought to look this up last week when I mounted a mail holder. Ended up placing one screw directly next to the anchor even though, like another commenter, I had measured twice. Owell. Now I can go shelf-and-whatever-else-hanging-crazy! THANK YOU! You just save many of my afternoons.
ha Kelly! I feel you pain. I have been there 🙂 Good luck with your future hanging projects and thanks for stopping by!
Thanks. . . great idea! Painters tape is my friend forever now!
You are brilliant! Thank you for posting this!
Great tutorial, thanks Just hung a shelf. You have to make sure you little dots on the painters tape are level too – I missed that bit!
What a BRILLIANT idea!! I searched for an easy way to hang my shelves and this worked like a charm!! THANK YOU so much!!!!
Yay! So glad you found the tutorial and like it 🙂
I wish I’d had this technique years ago! Thanks for sharing!
hello!
ive been researching in vain for weeks trying to figure out how people hang these beautiful shelfs, yours is the closest so far! but where did you get the shelfs? did you make them?
The shelves are from HomeGoods.
Well, back to the basement for some painter’s tape AND the spackle. LOL! thanks for the tip.