

DIY Gas Fireplace TV Wall | Split Level Makeover Before & After (Exterior Wall Install)
Article may have affiliate links. If you make a purchase, I may earn a tiny commission at no extra cost to you. Big thanks for supporting my small business.

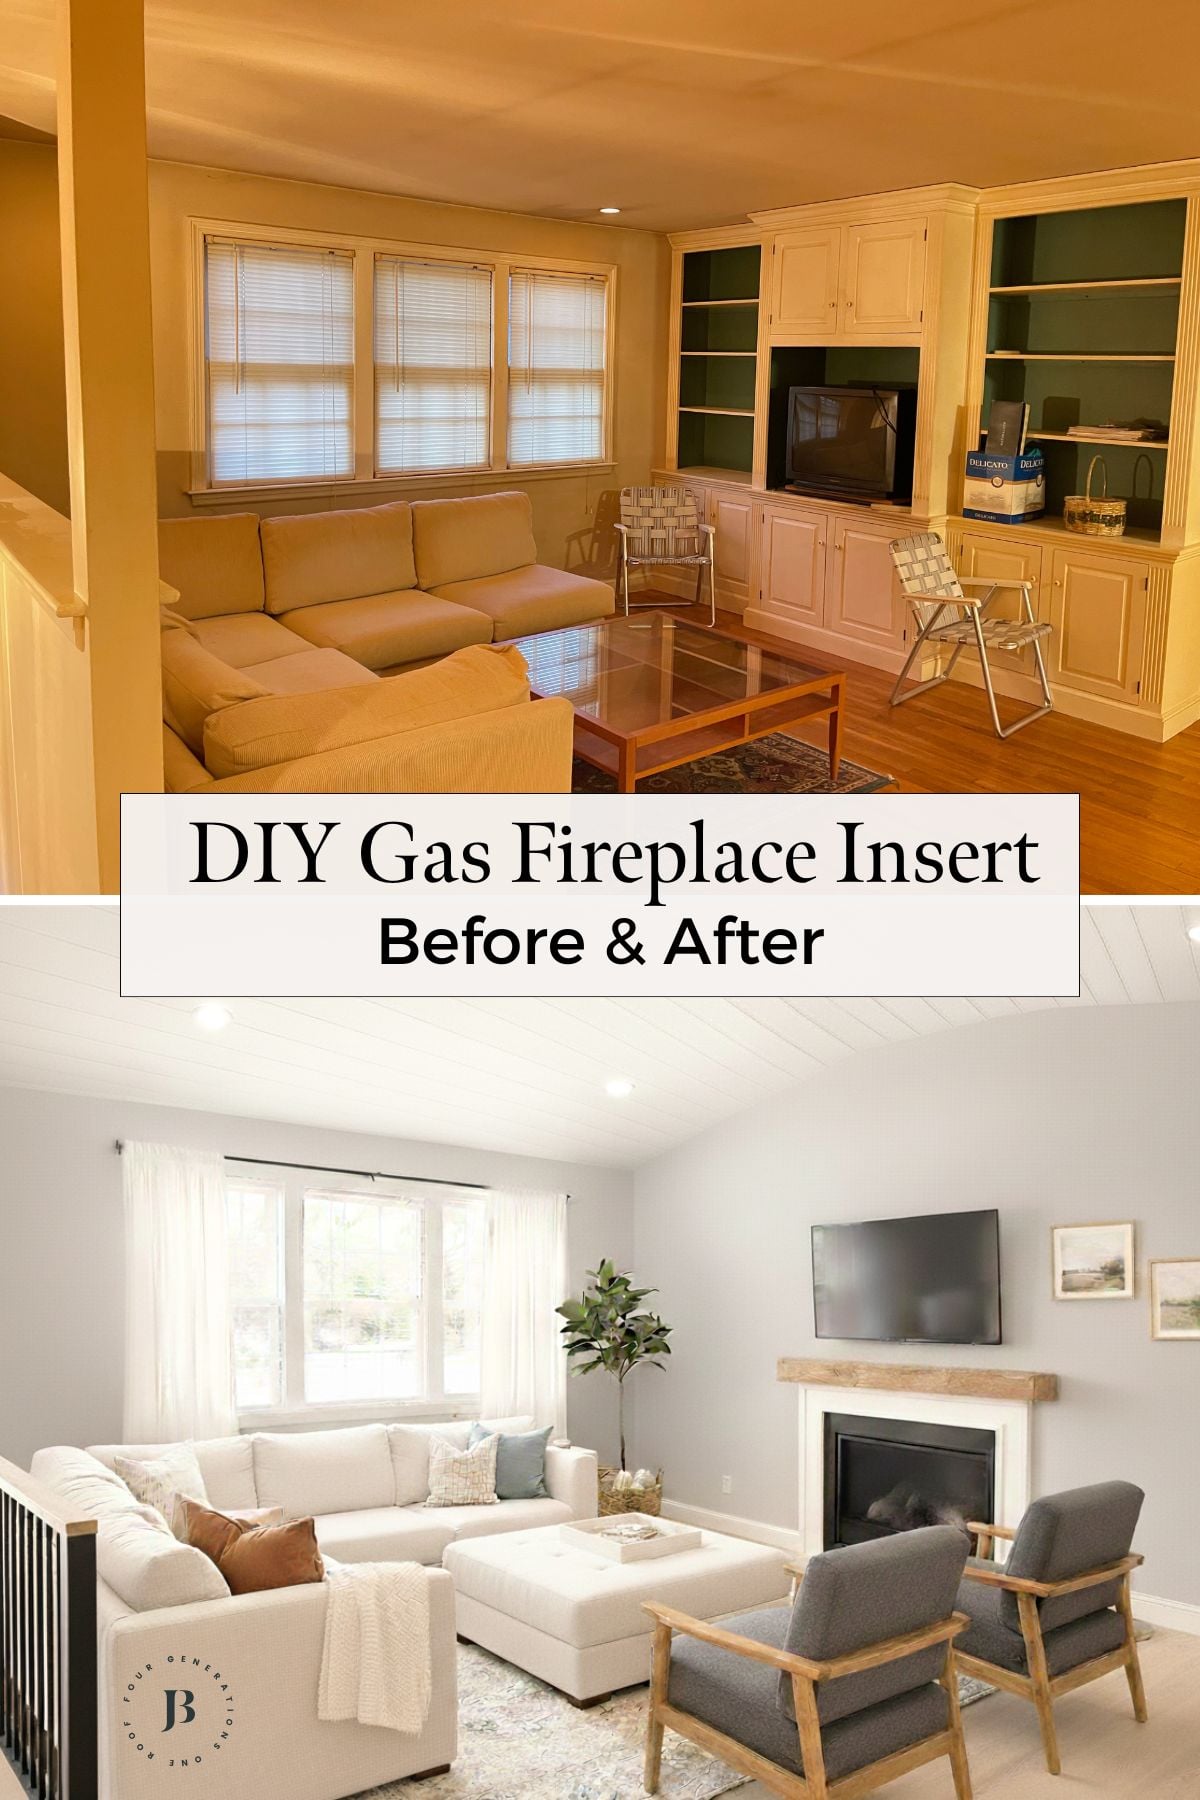
Remember the split-level with one massive blank wall and zero focal points? A DIY gas fireplace TV wall was the perfect project to fix the boring blank wall dilemma!
Adding a gas fireplace insert, without loosing space in the living room, seemed impossible until Jim said, “let’s just bump-out the exterior wall.” This solution gave us a flush-mount fireplace, TV mounting space, and kept every inch of living room square footage intact.

This was part of our full split-level gut renovation, and this fireplace became the anchor for the whole living room design.
Project Summary
Cost: $4,480 total (DIY framing + pro gas work)
Time: approx 19 hours spread out over a few days
Skill Level: Intermediate (hire out gas work)
Space Saved: 12-18 inches vs traditional fireplace build-out
Best For: Split-level homes, blank walls, exterior wall installs, small living rooms
The Split-Level Fireplace Problem
Before we renovated, the living room looked like this.

The previous owner had an older style tv/bookcase along the large wall and while it filled the space, it was too big and dated for the room.
You can catch up on the entire split level renovation series by visiting the split level reno page but the long and short of it is, Jim ripped out the ceiling and vaulted it, removed the load bearing wall between the kitchen and living room, replaced all the windows and refinished the floors. What a HUGE difference!
Once the newly remodeled living room started to take shape, we felt like the living room had one giant blank wall with zero architectural interest.
The Challenge
Traditional fireplace installations require building out an entire wall 12-18 inches to accommodate the fireplace box.

In a living room that’s already only 14 feet wide, building out would shrink it to 12.5 feet.
We’d already renovated the kitchen, bathroom, basement, and foyer. The living room fireplace was our last major move, and we weren’t about to sacrifice the only decent-sized room in the house.
Why Exterior Walls Complicate Installs
Unlike interior walls with stud space behind them, exterior walls in split-levels are only 6-8 inches deep total.
There’s nowhere to put a fireplace insert without building into the room or beyond the exterior wall.
Our solution: Build out, not in.
How To Build A Fireplace Wall For A Gas Insert
We’ve completed multiple fireplace makeovers (from our DIY electric fireplace insert to painting a 1950s stone fireplace) but this gas insert was the most complex because of the exterior wall challenge.
Step 1: Choose Your Fireplace Insert First (Then Frame To Fit)
Don’t frame the opening and then shop for an insert.
Select the exact model first, get specifications, then build framing to match.
Critical measurements:
- Width of insert (ours: 36 inches)
- Height of insert (ours: 28 inches)
- Depth of insert (ours: 14 inches—determines exterior bump-out)
- Clearance requirements (manufacturers specify exact clearances)
We worked with a fireplace company, selected the insert, and had them provide specs before Jim cut anything.
Step 2: Cut The Opening In The Exterior Wall
Jim used a saw to cut through drywall, studs, sheathing, and siding—creating an opening sized to fireplace specs.

What you’re cutting through:
- Interior drywall (1/2 inch)
- 2×4 or 2×6 studs
- Exterior sheathing (1/2 inch OSB)
- House wrap
- Exterior siding
CRITICAL: Check for wiring, plumbing, or HVAC before cutting.
We got lucky on this wall, but in other parts of the remodel (like opening the kitchen to the living room), we had to reroute electrical.

Step 3: Frame The Exterior Bump-Out (Space-Saving Secret)
On the OUTSIDE of the house, Jim framed a small bump-out to house the back portion of the insert.
Materials:
- 2×4 pressure-treated lumber (bottom plate)
- 1/2-inch exterior OSB sheathing
- House wrap (Tyvek)
- Vinyl siding to match existing
Dimensions: The bump-out extends 10 inches beyond the exterior wall, just enough for the 14-inch insert depth plus clearance.
Result: Zero interior space lost while getting a fully functional gas fireplace!

Step 4: Install The Gas Fireplace Insert (Hire Professionals)
Once framing was complete and inspected, the fireplace company installed the insert.
What the pros handled:
- Setting insert into framed opening
- Connecting gas line to propane tank
- Installing direct-vent system (vents straight out back)
- Testing for gas leaks and combustion
- Final inspection
Cost for professional gas work: $1,200
Not negotiable: We DIY’d floors, doors, and gutted the basement, but gas work always gets hired out.
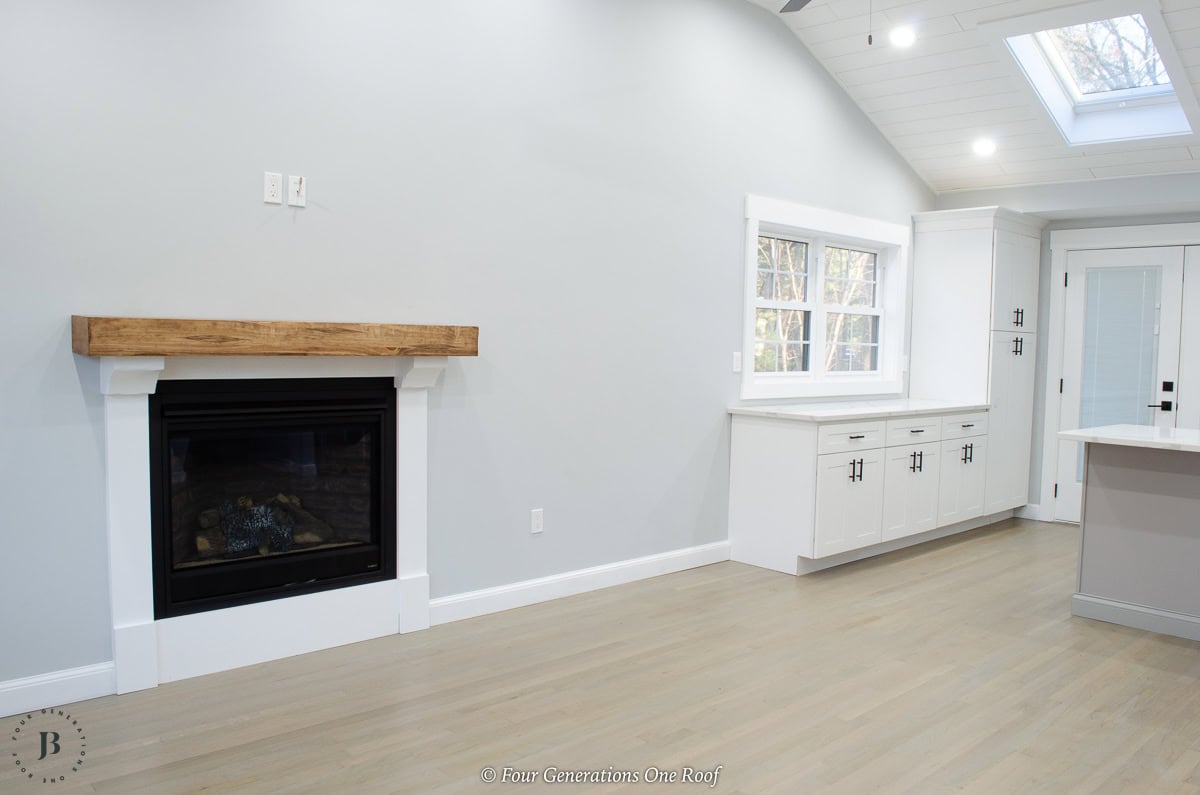
Step 5: Frame The Interior Surround
With the insert installed, Jim framed the interior to create a finished, flush look.

Interior framing:
- Drywall returns flush with existing wall
- Solid blocking for mantel (lag screws need something to bite into)
- Plywood backer board above fireplace for TV mounting
- Hidden outlet above mantel (behind TV)
Step 6: Add Rustic Wood Mantel + White Trim
Materials:
- Reclaimed 6×6 wood beam (6 feet long)
- White-painted MDF trim
- Construction adhesive + 6-inch lag screws
Design choice: Rustic wood + white trim balanced modern and warmth.
Here is a fun rendering I created staging the room with furniture.
Doesn’t it look so good?
You can see, by having the fireplace flush with the wall (no bump-out inside the house), it saved a ton of room!
Cost Breakdown: $4,880 Total
| Item | Cost |
| Gas fireplace insert | $2,500 |
| Professional gas line + venting | $1,200 |
| Framing materials & labor | $750 |
| Rustic wood mantel | $220 |
| White trim + paint | $130 |
| Hardware + fasteners | $80 |
| TOTAL | $4880 |
Professional quote for full install: $7000
What we spent: $4880
Savings: $2120
Project Timeline: 19 Hours (spread over a few days)
1st day (8 hours): Cut opening, frame exterior bump-out, install sheathing/siding, rough electrical
Midweek (2.5 hours): Gas company connects line, installs insert, completes inspection
2nd day (4 hours): Frame interior, hang drywall, tape, mud, sand, prime – let dry
3rd day (4 hours): Install mantel, trim, paint, mount TV, final touches
Total: approx 19 hours spread out over a few days
Why This Works For Small Living Rooms
Creating A Focal Point
Split-levels have large blank walls that feel awkward.
You can’t just hang art on a 12-foot wall. A flush-mount fireplace creates a gathering spot, gives the room purpose, and provides a natural TV location.
Before this fireplace, there was nowhere to put a TV without blocking windows or feeling random.
Now it’s centered above the fireplace with clear furniture placement.
DIY vs. Hire: What We’d Do Differently
DIY (if you have experience):
- Cutting wall opening
- All framing (exterior + interior)
- Mantel and trim installation
- Exterior siding and weatherproofing
- All finish carpentry and painting
What We Hired Out:
- Gas line connection
- Fireplace insert installation
- Venting system
- Testing and inspection
Our take: If you’re comfortable with framing and finish work, you can handle 70% of this project.
But don’t mess with gas lines. Ever.
First-timer? Start with an electric fireplace insert first. Learn framing and trim without gas complexity.
Common Questions About Gas Fireplace TV Walls
Yes. Check your manufacturer’s clearance specs. Most modern direct-vent inserts produce minimal heat above the mantel.
Consider an electric fireplace insert. No gas line, no venting, easier DIY, cheaper ($800-$2,000 vs $4,000-$6,500). Trade-off: No real flame, lower heat output, higher operating cost.

Final Thoughts: Build Out, Not In
We’ve completed multiple fireplace projects, painting stone surrounds, electric inserts, and this gas install.
Every project reinforced one principle:
When space is limited, build OUT, never IN.
Traditional installs build INTO your room, stealing 12-18 inches.
This exterior bump-out builds BEYOND your wall, keeping 100% of interior space while giving you a fireplace, TV wall, and focal point.
Related Split-Level Projects
This fireplace was part of our complete Split-Level renovation:
- Split-Level Kitchen Remodel: Before & After (opened to living room)
- Split-Level Foyer Makeover (removed half wall)
- Split-Level Bathroom Remodel (full gut)
- Split level exterior before and after
Want the full story? Start with our Split-Level House Remodel post.
Save This Tutorial To Pinterest: Save This DIY Fireplace TV Wall Tutorial
Questions about exterior wall fireplace installs? Drop them in the comments. I’ve done this across multiple homes and I’m happy to troubleshoot your specific situation!

Meet Jessica
What started as a hobby, Jessica’s blog now has millions of people visit yearly and while many of the projects and posts look and sound perfect, life hasn’t always been easy. Read Jessica’s story and how overcoming death, divorce and dementia was one of her biggest life lessons to date.