

How to Paint Kitchen Cabinets Like a Pro (Yes even 2000s cherry stain)
Article may have affiliate links. If you make a purchase, I may earn a tiny commission at no extra cost to you. Big thanks for supporting my small business.
Staring at those dark, dated kitchen cabinets from the early 2000s? I get it—we had the same problem. Our kitchen felt like a cave, all dark cherry stain and heavy vibes that made cooking feel more like punishment than pleasure.
But…. here’s the thing, you don’t need to drop $30K on a full cabinet replacement to get that bright, modern kitchen you’re dreaming of.
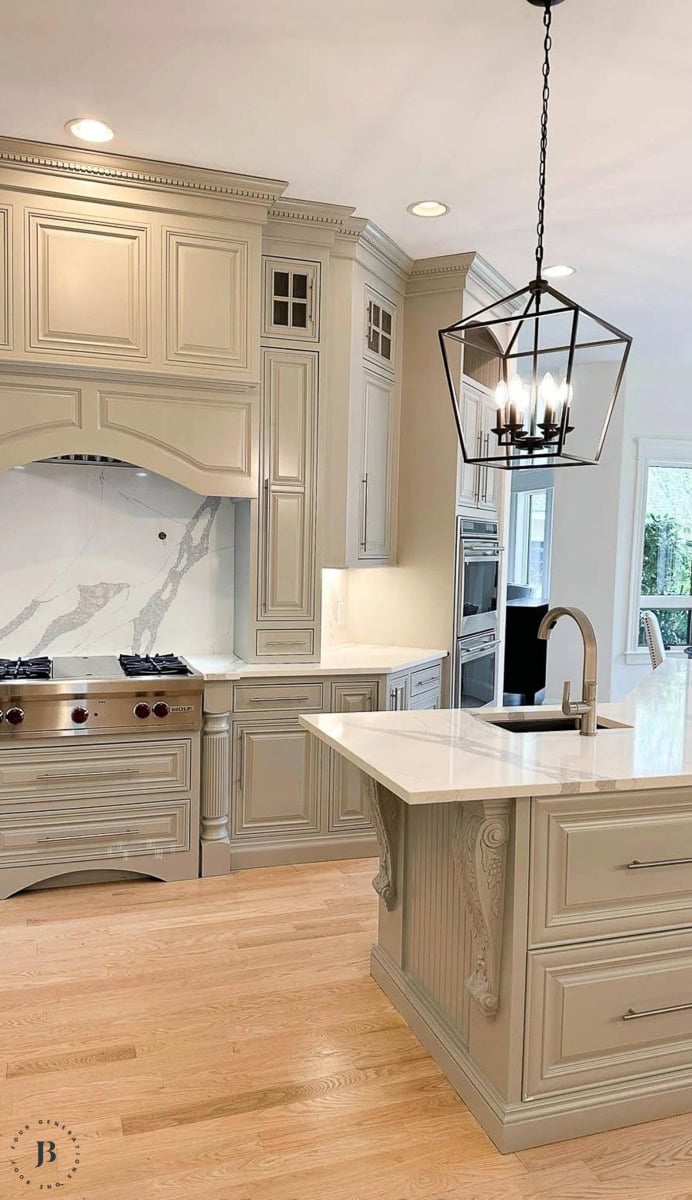
We updated our early-2000s cabinets with Sherwin-Williams Mindful Gray (sprayed with Benjamin Moore Advance), paired with white quartz countertops, and the before/after still makes me smile every time I walk in for coffee.
Key Takeaways (Because Who Has Time to Read Everything?)
- The reality check: Quality cabinet replacement runs $15,000–40,000+. Professional cabinet painting? $3,000–8,000. DIY cabinet painting? $300–800 in materials.
- Process: Degrease, scuff sand (100–150 grit), apply BIN shellac primer, then STIX bonding primer, followed by 2 coats Benjamin Moore Advance (satin). Let cure, then reinstall with new hardware.
- Timing: About 7–10 days start to finish—and 60% of that time is prep work. Seriously.
- DIY vs Pro: Roll and brush leaves light texture, spraying delivers that factory-smooth finish. Hire out if you lack sprayer, space, or time (like we did).
- Our color: SW Mindful Gray 7016 at full strength—we tested 50% but loved the full-strength contrast with white quartz.
Before & After (Why We Actually Did This)
Let me be honest—when we first started planning our kitchen renovation plans, I was ready to rip everything out.
Those dark cabinets felt so… 2000.

But after getting quotes and really looking at the cabinet boxes themselves, we realized they were solid wood construction. The bones were good—they just needed a fresh updated look.
We kept the cabinet boxes (solid and well-built), updated the finish, swapped in soft-close hinges and new pulls, and paired everything with white quartz and a quartz backsplash.
The result: a brighter, modern kitchen without a full-gut price tag. The math was pretty clear.

5 Things to Decide Before You Open a Paint Can
Before you crack open a single paint can and start dreaming about your Pinterest-worthy kitchen, answer these questions honestly:
- Cabinet Material: Solid wood and quality veneers paint beautifully with proper prep. Laminate or thermofoil needs special prep and often isn’t worth it long-term. Pro tip: If you’re not sure what you’re working with, sand a small hidden area. Wood will produce dust; laminate will create plastic shavings.
- Condition Reality Check: Walk around with a notepad and honestly assess loose hinges, chips, water damage, and separated seams. Address these issues before painting—trust me on this one.
- Finish Expectations: Rolling and brushing gives slight texture (totally fine for most people); spraying provides that factory-smooth look (what we wanted).
- Color and Sheen Strategy: Going from dark to light? You’re in for more prep work but the payoff is huge. We used SW Mindful Gray 7016 because it’s timeless enough to not look dated in 5 years. Satin hides wear better than semi-gloss in busy kitchens.
- Time and Space Reality: Doors need horizontal drying space and dust control for about 7–10 days. A garage spray tent works perfectly if you’re going the DIY route.
Real talk: Heavy oak grain shows through paint unless you fill the grain or use extra primer and sanding. Decide if you want silky-smooth or are fine with subtle texture before you start.

Should You DIY or Hire a Pro?
This isn’t your average weekend project.
Cabinet painting is time-intensive, detail-oriented work that requires patience (lots of it) and the right tools.
We ended up hiring professionals because we literally couldn’t live without our kitchen for weeks, and honestly?
Best money we ever spent.
DIY Might Be Right If You…
- Have 2+ weeks to dedicate to the project
- Don’t mind a little roller or brush texture
- Have a dust-free space for drying
- Are patient with masking and dry times
- Budget is tight but time is flexible
Hire a Pro If You…
- Want that factory spray finish
- Have detailed door profiles
- Need your kitchen functional quickly
- Lack time, space, or sprayer equipment
- Time is more valuable than money in your situation
Our Step-by-Step: How to Paint Kitchen Cabinets Like a Pro
Step 1: Remove Everything (And Photograph It)
Start by photographing your kitchen setup—you’ll thank me later when you’re trying to remember which door goes where. Label everything with painter’s tape and a marker.
Remove:
- All cabinet doors and drawer fronts
- Shelves (if removable)
- All hardware and hinges

Store everything in a climate-controlled space. Temperature fluctuations during the painting process can cause issues with paint adhesion.
Step 2: Mask and Protect (This Separates the Pros from Weekend Warriors)
Cover floors, counters, cabinet interiors, and appliances with builder’s paper and plastic sheeting.

Wrap lighting fixtures too.
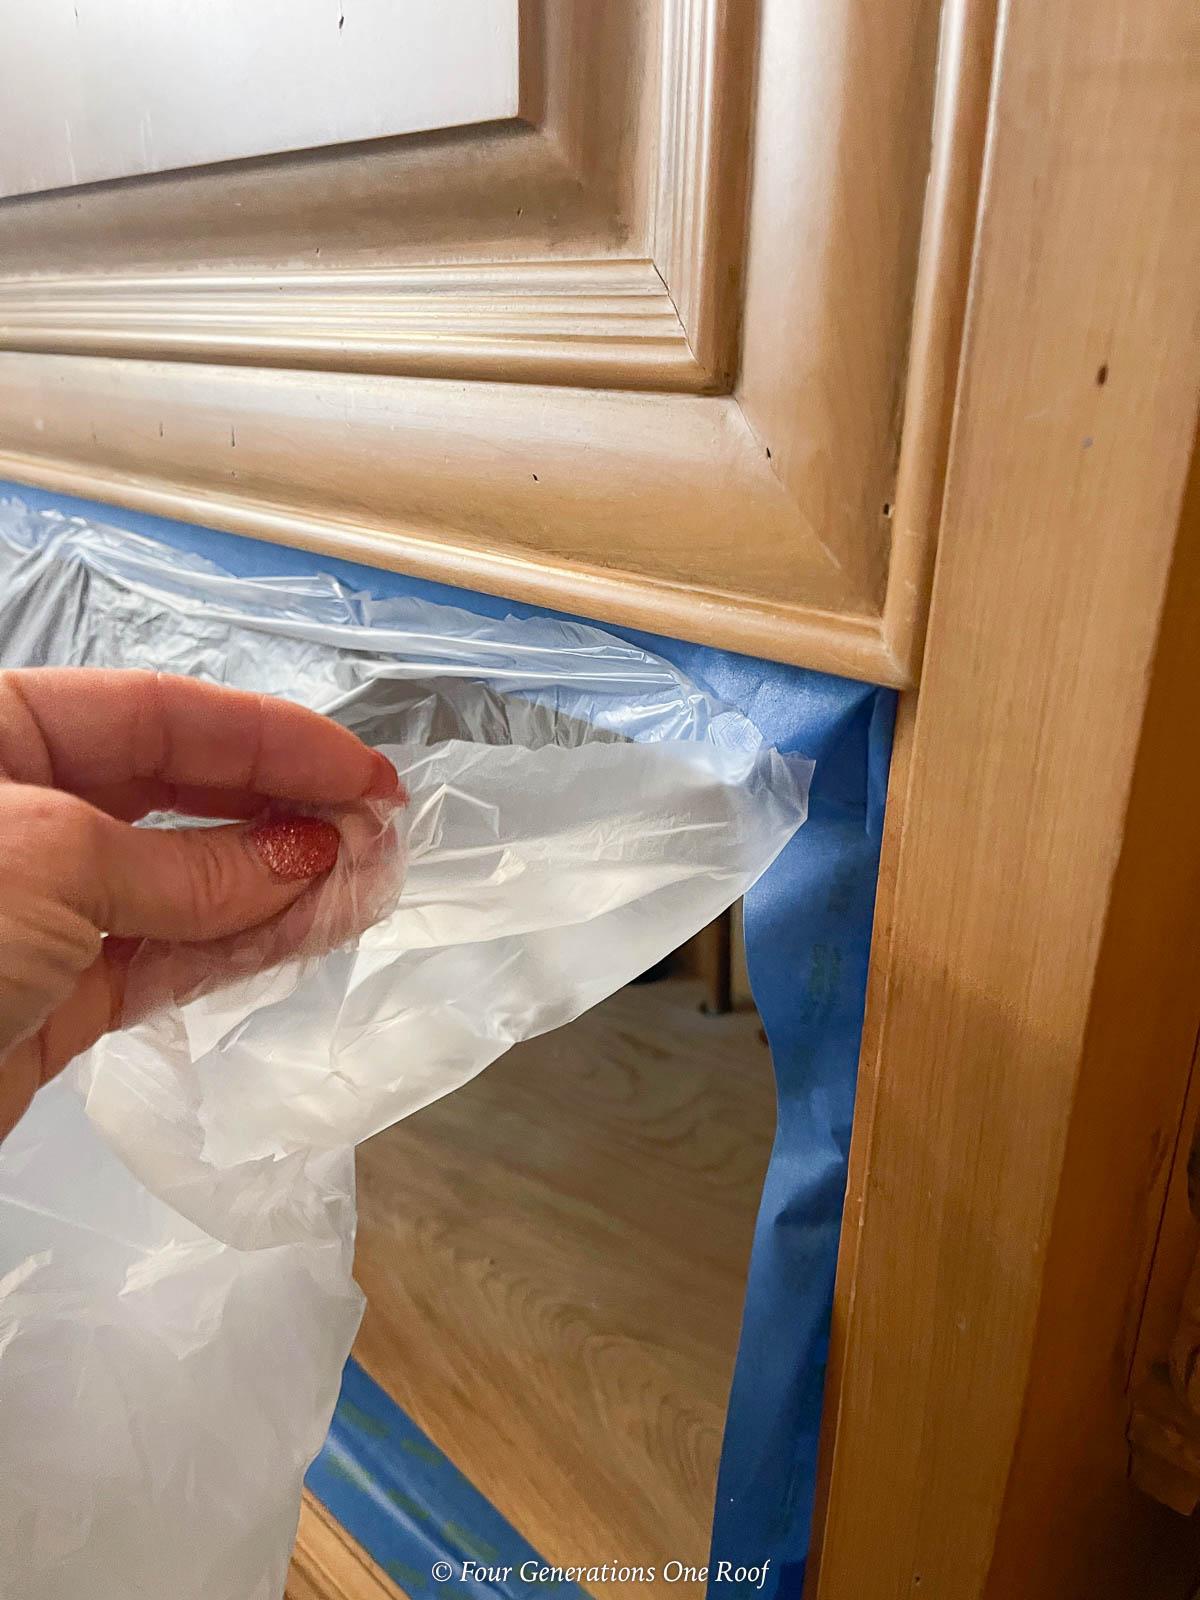
Don’t cheap out on materials here—paint overspray gets everywhere, and removing dried paint from granite counters is not fun.
Step 3: Degrease and Patch
Clean thoroughly with a degreaser (Krud Kutter works great).

Fill dings, scratches, and any old hardware holes with quality wood filler, then sand smooth.
Let filler cure completely (usually 24 hours) before moving on.
Step 4: Scuff Sand for Adhesion
Sand with 100–150 grit to remove sheen and give primer something to grip.
You’re not trying to strip the finish completely—just break the gloss.
Run your hand over the surface afterward; it should feel slightly rough. Vacuum and wipe down all dust with a tack cloth.
Step 5: Prime Properly (This Is Critical for Dark Cabinets)
For dark cabinets going light, use this two-primer system (yes, this seems excessive; yes, it’s absolutely necessary for professional results):
- First coat: Zinsser BIN (shellac) to block stains and tannins. Allow 24 hours to dry completely.
- Second coat: INSL-X STIX (bonding) for adhesion and durability. Allow 24 hours to dry.

Step 6: Paint the Cabinet Boxes
We used Benjamin Moore Advance (waterborne alkyd) in satin. It levels beautifully, cures hard, cleans with soap and water, and has way less odor than oil-based paint.

Application method: Spray with an HVLP or airless sprayer for best results. If rolling, use a foam roller and a quality angled brush (we love Purdy brushes).
Wait 24 hours between coats—rushing this step ruins everything.
Step 7: Paint Doors and Drawer Fronts
Use a spray tent in the garage to contain overspray (those plastic tent setups work great).
Follow the same process: BIN primer, STIX primer, then two coats of Advance, letting each coat dry 24 hours.
Create a horizontal drying station using sawhorses and boards.
This prevents drip marks and lets you paint multiple pieces efficiently.
For more details, read: how many coats of paint for kitchen cabinets.
Step 8: Reinstall and Add Hardware
After the final coat dries at least 24 hours, reinstall doors and drawers.
We added soft-close hinges and new pulls for that “everything feels brand new” upgrade.

See: how to choose kitchen cabinet hardware.
How to Get That Smooth, Factory Finish
The difference between DIY-obvious and pro-quality comes down to these details:
- Prep carefully: Every imperfection shows under paint. Wood filler is your friend.
- Control dust: Use a spray tent and keep the space clean.
- Apply multiple light coats instead of trying to cover everything in one thick coat.
- Work in good conditions: 60–80°F and under 60% humidity. High humidity extends dry times significantly.
- Be patient: 24-hour dry time isn’t a suggestion—it’s mandatory for durability.
Troubleshooting: When Things Go Wrong
Because let’s be honest—things don’t always go perfectly, even for pros:
- Tannin bleed (dark spots showing through): Add another coat of BIN primer. Don’t skip this step thinking you can cover it with paint.
- Brush marks: Use quality brushes and rollers, maintain a wet edge, and avoid over-brushing. If spraying, check your technique and distance.
- Orange peel texture: Usually from spraying too thick or holding the gun too far away. Adjust your technique.
- Sticky doors: Often due to humidity or rushing cure time. Give it more time and use felt bumpers to prevent sticking.
- Chipping at handles: Usually from poor adhesion or using the kitchen too early. Sand, reprime, touch up, and let cure properly this time.
What You Actually Need: Materials and Tools
- Degreaser (Krud Kutter or similar)
- 100–150 grit and 220–320 grit sandpaper
- Zinsser BIN shellac primer
- INSL-X STIX bonding primer
- Benjamin Moore Advance, satin finish
- Foam rollers and Purdy angled brush
- Paint sprayer (HVLP or airless)
- Plastic sheeting, builder’s paper, blue tape, respirator
- Quality wood filler, sawhorses, paint booth tent
You can find all of our paint supplies on our Amazon Paint Storefront.
Our Paint Choice: SW Mindful Gray Deep Dive
We tested Sherwin Williams Mindful Gray at 100% and 50% strength, and chose full strength for better contrast with our white quartz.
Here’s why this color works:
- Makes spaces feel larger without going stark white
- Timeless enough to not look dated in 5 years
- Has just enough warmth to prevent that sterile feeling
- Hides fingerprints better than pure white
- Pairs well with both warm and cool accents

Mindful Gray SW 7016
Slightly warm undertone
If you’re looking for more gray options, check out our post on 7 best grey kitchen cabinet colors for more inspiration.
Timeline Reality Check
Curious about how long this actually takes? Here’s the realistic breakdown:
- Day 1–2: Removal and prep work
- Day 3: Patching and first sanding
- Day 4: First primer coat (BIN)
- Day 5: Second primer coat (STIX)
- Day 6: First paint coat
- Day 7: Second paint coat
- Day 8–10: Door/drawer painting and final assembly
The entire paint job took about 7–10 days, and the drying time between coats is what takes the longest. High humidity or cold temperatures can extend these times significantly.
Our Final Results
The transformation completely changed how our kitchen feels.

What used to be a dark, closed-off space now feels bright and open.
See the full tour here: Grey Kitchen Cabinets with White Countertops.
Our cost breakdown: Professional painting ($4,200) + New hardware ($300) + New hinges ($150) = $4,650 total vs. $25,000+ for replacement.
With proper preparation and care, painting kitchen cabinets can be relatively easy and very rewarding—sometimes the best home improvement decisions aren’t about doing everything yourself, but knowing when to invest in expertise for results you’ll love for years to come.
Related: Visit 8 ways to update your kitchen on a budget for more details on our kitchen makeover.
Frequently Asked Questions
- How long does cabinet painting actually take? About 7–10 days including dry times. Full cure takes 3–4 weeks, but you can use your kitchen lightly after a week.
- Do I need a clear coat over Benjamin Moore Advance? No, the satin finish is durable once fully cured.
- Can I skip sanding if I use a bonding primer? No, a light sand improves adhesion and reveals flaws you need to address.
- What sheen is best for kitchen cabinets? Satin is easy to clean and forgiving. Semi-gloss shows every imperfection.
- When can I actually use my kitchen again? Light use after 7 days, but avoid heavy cleaning or slamming doors until fully cured (3–4 weeks).
- Will oak grain show through the paint? Yes, unless you fill the grain first or use extra primer coats and sanding.
- What’s the difference between oil and water-based paint for cabinets? Water-based (like Advance) has less odor, cleans up easier, and dries faster. Oil-based is more durable but smells terrible and takes longer to cure.
- How much does DIY cabinet painting actually cost? Materials run $300–800 for an average kitchen. Professional job costs $3,000–8,000 vs. $15,000–40,000+ for replacement.
Wrapping Up
If your cabinet boxes are in good shape but the style is stuck in the past, painting can give you that fresh, modern look without the full renovation headache.
Just don’t underestimate the prep work (seriously, budget 60% of your time for this), invest in quality materials, and be honest about whether you want to tackle this yourself or call in the pros.
The before and after of our kitchen doesn’t just look different—it feels different. Which I couldn’t be happier about :).

Meet Jessica
What started as a hobby, Jessica’s blog now has millions of people visit yearly and while many of the projects and posts look and sound perfect, life hasn’t always been easy. Read Jessica’s story and how overcoming death, divorce and dementia was one of her biggest life lessons to date.