

DIY Mailbox Ideas: How To Build In A Weekend
Article may have affiliate links. If you make a purchase, I may earn a tiny commission at no extra cost to you. Big thanks for supporting my small business.
Let’s Talk Mailboxes, Because Ours Was a 30-Year-Old Disaster!
You ever look at your mailbox and think, “Wow, you’ve really seen some things”? That was us. Our poor mailbox was pushing 30, rotting at the base, and leaning just enough to scream “help” every time the wind blew.
So my dad and I decided to build a new one from scratch. And not just any mailbox. We built a little wooden house on a post that’s sturdy, charming, and actually matches the vibe of our home.
Now before you start picturing power tools flying and weekend chaos, let me say this project was surprisingly manageable. You can absolutely build a DIY mailbox in an afternoon, especially if you keep it simple or rope in a parent who’s handy and still answers your texts.
We knocked out the main structure on a Saturday and added the finishing touches the next day. The result? A durable, weatherproof mailbox that makes mail delivery feel a little fancy.

DIY Mailbox Makeover
If you searched Google and Pinterest (like I did) for mailbox styles, you likely found thousands of mailbox designs resembling everything from a modern mailbox house to a farmhouse design.
We opted to “wing it” and make a mailbox that resembled a simple clean line house and painted it the same color as our house.
Pro tip: Before you break out the wood glue and post hole digger, double check your local USPS rules. Height and distance from the curb do matter, and your mail carrier will thank you for getting it right.
We measured the existing mailbox base and decided to customize the new mailbox house to the existing dimensions. Someday we will add a new mailbox post and base (the base is what your mailbox sits on and is attached to) but for now, the mailbox is the first priority.
We used pressure treated wood as it’s weather resistant and will not rot.
This mailbox diy post is something that we used left over scrap wood from a previous project so it didn’t cost us a lot of money. You will need to invest a small amount of money to purchase the following materials/supplies.
I would say this is an intermediate diy project as you will need some knowledge about cutting wood angles and have the correct saws to complete the project.
DIY Mailbox Supplies needed:
Materials & Tools Used:
- Mailbox accessories (flag, knob, and house number)
- 1” pressure-treated wood
- 1 1/4” finish nails
- Finish nail gun
- Compressor
- 1 1/4” galvanized screws
- Miter saw
- Table saw (or have wood pre-cut at your local lumber store)
- Wood Filler
- Sandpaper
- Paint
Wood Dimensions
- 1″ x 7″ cut to the length of 17 1/4 “
- (2) 1″x3″ cut to the length of 17 1/4″
- (2) 1″ x 3″ cut to the length of 8 1/4″

We used a finish gun to nail the sides to the base. Once you are finished with each section, you will need to reinforce the areas that you nailed with galvanized screws to ensure stability.
In our case, we need to make sure the plow trucks don’t send our little o’l homemade mailbox for a ride during the winter snowy months.

This part fits right on top of our existing mailbox base.

Next we cut our sides of the mailbox. Be sure to wear safety glasses.

While my dad was cutting the rest of the wood, I listened to some tunes on my 3M Tekk Protection headphones (which are kind of cool I might add) and screwed the base together. They play am/fm radio or you can use your ipod.
 headphones (which are kind of cool I might add) and screwed the base together. They play am/fm radio or you can use your ipod.
TIP: Don’t forget as you work, to reinforce with screws.

Wooden DIY Mailbox – Dimensions
- Mailbox Bottom dimension: 1″ x 10″ cut to the length of 20″ (1 piece)
- Mailbox Side dimensions: 1″ x 7″ cut to length of 20″ (2 pieces).
- Nail the mailbox bottom and sides to the base.

You will need to flip the box over in order to nail the sides to the base.

Roof Dimensions
1″ x 7″ cut to length of 22″ (2 pieces)
We cut the “peak” of the roof at a 30 degree angle using our miter saw. We assembled the roof together before we added it to the sides of the mailbox.


Mailbox Front Dimensions
You will need to make a door as well as a 30 degree peak for the front of your mailbox.
We cut the piece (with our miter saw set to a 30 degree angle) to fit up into the peak of the roof first and then nailed it to the roof part of the mailbox.
See the 30 degree angle below with a length of 8 1/2 ” long by 4 1/4 ” high.
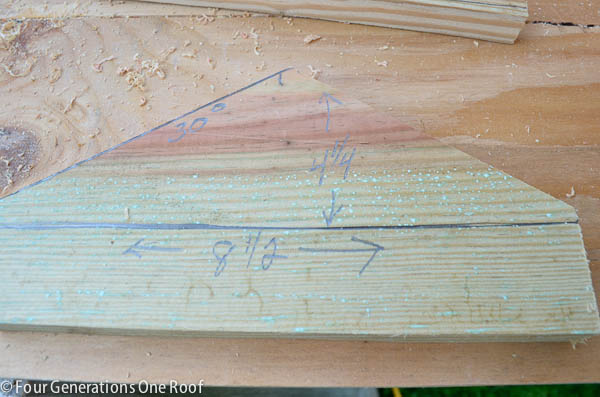
Nail this piece up under the roof in the front (where your door goes). See below.
Next cut a smaller piece (same as above) but only 3″ high. You need to do this in order for your door to have something to rest against or you may need to use a magnet set on the door to keep it closed.


Mailbox Door Dimensions
Our door is 8 1/2″ wide by 7″ high. Use a piano hinge or side bolts to assemble the door to the mailbox. We used a piano hinge.

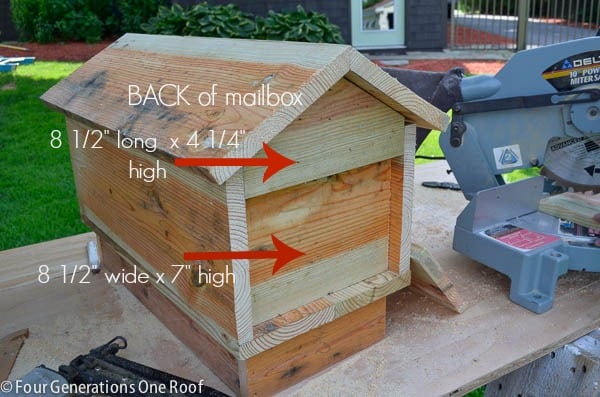
Do the same for the back of the mailbox except you do not need to make a door. I decided that I wanted it to be two pieces because I wanted a bit of dimension, not all one piece.
You can do either but I liked the option of being able to paint the back piece a two-toned color. You will see what I mean at the end once it is all painted.
Now it was time to fill the holes, sand and paint our homemade house mailbox.

I let my son try out the headphones and he loved listening to his kidz pop tunes while he was teaching himself how to make a mailbox. So cute!

Viola, the diy wooden mailbox project is complete!
The old mailbox was literally hanging by a nail! I should note, this project took place at our old house (which you can take a tour of by clicking through this post, “our multigenerational home for sale.“)
DIY Mailbox Post
We used our old round metal mailbox post and added a new frame bracket underneath our DIY mailbox to fasten. I thought I had pictures of the rusted mailbox post but I seem to have lost them! I ended up spray painting the old post black to give it a new fresh look.
You could purchase a cast aluminum, stainless steel or even a vinyl mailbox post.
Another option would be to make a DIY mailbox post out of 6×6 cedar or pressure wood which are both weather/rot resistant. Cedar would add natural charm but would most likely cost more.

You can add whatever decorative elements you want or even stencil your name or house number. I chose to purchase the aluminum black numbers and I spray painted a wooden knob as the door pull.
I decided to the paint the mailbox similar colors to our home to coordinate the two.

I also spray painted the existing metal mailbox post a deep brown color and it actually looks brand new!


With just a few basic tools and a free afternoon, you can build a custom mailbox that adds charm to your curb and holds up for years to come


Keep in mind there are several curbside mailbox options (some that are even extra large if you get a high volume amount of mail) and if you are not game for making your own, you can always install a plastic mailbox or a galvanized steel mailbox with several mailbox features.
Locking mailboxes are great for wall mounted versions on your house and offer a variety of features that normally are not on curbside mailboxes.
A DIY mailbox that looks like a wooden house may seem overwhelming at first and I won’t lie, I was a little overwhelmed when we started this project but as we got going, it moved right along.
Total time for the project was 2.5 hours constructing and another 3 hours prepping for paint and adding the accessories.
This post was a collaboration with 3M Tekk Protection

Meet Jessica
What started as a hobby, Jessica’s blog now has millions of people visit yearly and while many of the projects and posts look and sound perfect, life hasn’t always been easy. Read Jessica’s story and how overcoming death, divorce and dementia was one of her biggest life lessons to date.
Sweet! Thanks for the measurements!
I love how cute this turned out Jess!! shared on pinterest and G+
Thank you Cheryl! I appreciate the shares 🙂
It turned out great Jess! I like how you walk us through the process step-by-step. Very helpful! Those 3M Headphones are a hot item in our house too! Sharing & Pinning this!
Thank you Kim!
Amazing! Never would’ve thought to make my own mailbox. My mailman would be ever so appreciative so he didn’t have to keep shoving my magazines through the door slot :).
ha 🙂 Thank you Meaghan!
This is a very neat project, BUT, you should be aware that because it is not USPS Postmaster approved, your mailperson can actually refuse to use it !!! The Postmaster approved thing is why many custom mailboxes are built around a standard mailbox.
WAY cuter than buying one! you and your dad make quite a team. 🙂
Heather
awww thanks Heather 🙂
I love how it turned out!
It looks fabulous!! I love so many 3m products.
What a great project, love your mailbox!!
The finish product needs weather proofing please put shingles on the roof to weather proof the mailbox other wise it is a very cute and lovably project.
Truly Yours Pat.
great project and thanks for sharing. can you please tell me what kind of wood you guys used. Thanks
Pressure treated wood
I love your mailbox! I am wondering if you had a problem with your mailman taking your mail; I was under the impression it has to say USPS approved on the door? I hope it isn’t an issue, I would love to build one!
The postal code does require an approved mailbox, but, that doesn’t your letter carrier will refuse to deliver. You could have the same carrier for ten years who doesn’t care; get a new carrier who makes an issue of it and you need a new mailbox or you’ll have pick up your mail at the Post Office.
Build this around an approved mailbox and you’re good to go (as long as the pick-up flag is relocated to the outside).
What keeps the door shut? Just pressure from the sides? Over a little time wouldn’t the wood swell and/or shrink; causing door problems? Thanks, R. Goode
You could add a little eye hook but ours stayed shut due to the pressure on the sides