

How to repair a cracked and old cement patio {before & after}
Article may have affiliate links. If you make a purchase, I may earn a tiny commission at no extra cost to you. Big thanks for supporting my small business.
Today we are sharing how to repair a cracked and old cement patio that we completed at our old house.
This post was updated November 2021 to reflect an updated version of this product. The product link is towards the bottom of this post. This post was not sponsored, we just really liked the outcome of the space so we shared with you!
Concrete patio repair
The patio had been neglected and seriously damaged through the winter storms. My dad completely ruined it (he says he didn’t, but he did) when he put down some kind of a rock salt during the winter that ate through the cement like it was a little scooby snack.
TIP: If you have deep cracks or large concrete pieces missing, you will need to use a filler product prior to fix them. Read the directions on the back of the product to ensure you are applying properly.
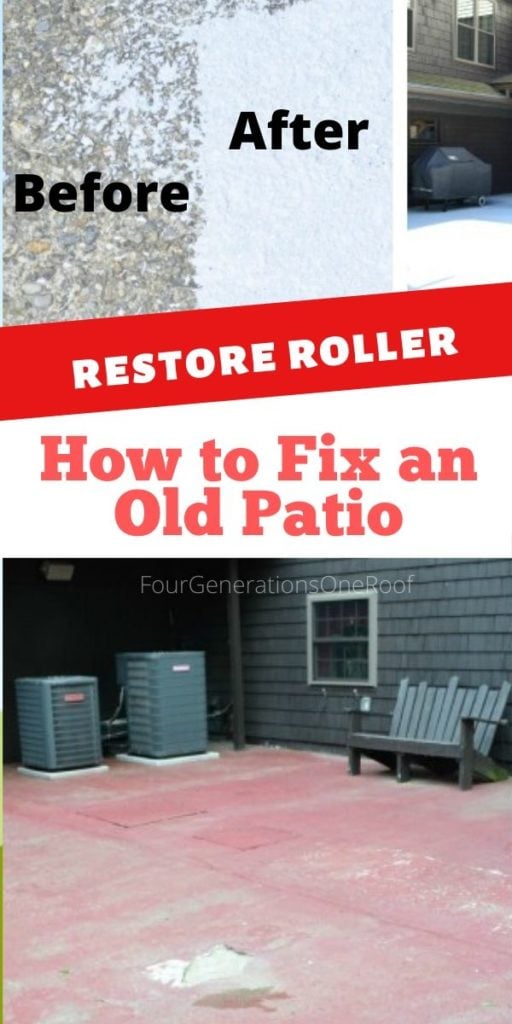
How to Fix an Old Cracked Concrete Patio

Here is the before:

The patio was a mix of old red paint, gray original cement, cracks and holes. Can you say, mess?! After a good power washing and removing any loose cement, we added 23 gallons of the Concrete RESTORE.
The space is about 400 sq.ft. We bought the large 4 gallon buckets as well as the RESTORE roller.
Attach the roller with a long handled paint roller and simply dump the concrete/paint mixture and roll it on. It is SO easy!
Repair a cracked concrete patio
")
We picked the color Cape Cod Gray to have the RESTORE cement tinted to. There are so many colors available. I spread this entire 450 square foot area in about 2.5 hours. One important tip, do not roll it on like you would when painting a wall (back and forth).
The directions say to use a paint tray ect. I simply dumped 1/4 – 1/2 of the bucket on the cement and worked in sections. When you spread the cement, simply pull it towards you or push away from you. Do not roll over back and forth. This stuff is very thick but easy to spread.
I highly recommend the special RESTORE roller.
Do not use a regular paint roller.
If you take a break in between, just wrap your roller in a plastic grocery bag. That’s what I did 🙂
Ok, now for the good part, here is how my mom’s patio is looking now!
Concrete Patio Resurfacing Ideas


How to make a concrete patio look better
My gramps made these DIY adirondack chairs and couch. Isn’t he talented? I told him we are going to make some more for “my side” of the yard and I’ll be taking pictures of him to post on the blog. I think we need a tutorial on these, don’t you?
We gave them a fresh coat of water-based stain and I think they are looking pretty snazzy!
What do you think of that DIY lattice privacy screen to hide the air compressor units? My dad and I recently made it one Saturday afternoon, I will post the tutorial soon!

My mom loves black and sand colors together so we used her existing cushions along with some DIY bolster pillows from the fabric I had left over from our dining room makeover.

My mom is loving her new space! Especially the Cape Cod Gray cement color.
Learning how to repair a cracked and old cement patio can seem overwhelming. One of the biggest tips I can offer no matter what product you use is to prep your surface properly.

This is where my mom drinks her coffee every morning. It’s a pretty cozy spot!

RELATED: How to spruce up your patio with a Solar Speaker
There are many concrete covering ideas out there. So what do you think? Would you be daring enough to dump tinted cement and resurface an old worn cement patio or even a deck? This stuff can be used on a deck also. I had no idea how to repair a cracked and old cement patio prior to using this product and I’m happy I gave it a try.
The patio isn’t perfect but it’s certainly better than it was.
You can view the DIY lattice privacy screen tutorial here.
If you would like to see our other outdoor makeovers, check out our patio at our new house.
This patio was at our old house and we completed our patio a few years back. Since then a newer version of RESTORE has been produced so visit their site to find what best suits your needs.
PS. Total cost = under $275 (cost of cement product + lattice for privacy screen)

Meet Jessica
What started as a hobby, Jessica’s blog now has millions of people visit yearly and while many of the projects and posts look and sound perfect, life hasn’t always been easy. Read Jessica’s story and how overcoming death, divorce and dementia was one of her biggest life lessons to date.
Jessica, it looks amazing! I don’t know how you do all you do! The patio with the cape cod gray looks excellent. Please, please, please post a tutorial on the chairs. I’d love to make some.
Looks great! I know your mom is really enjoying her “new” spot. 🙂
Thank you Heather!
This is a great makeover, Jessica! You are brave to spread concrete…and strong. I need to resurface my driveway (had to have a section re-poured…of course it doesn’t match)…I wonder if this would work? Thanks for sharing your project.
Thankyou! I would NOT use this on your driveway. I believe the directions say not to use it in the garage b/c the tires will wreck it. They make an epoxy specific for garage floors though so you could certainly check to see if there is a product compatible for driveways. Our driveway is a mess also and I really think re-tarring it is the best solution or rip it up and lay brick. Not in my lifetime though 🙂 hehe.
What a fabulous transformation–your Mom must be thrilled! I love how you don’t shy away from projects others may find intimidating. The privacy screen is brilliant and the whole space just looks beautiful and very inviting.
Hey Nancy! Thanks so much, hope you are enjoying your summer!
The patio is so pretty! What an inviting space to relax! I love all your flowering planters! The are overflowing! We’ve been so hot I can barely keep any of mine alive. It turned out beautiful Jess!
Thank you Kim 🙂
Hi Jessica, I just found your blog through Sand and Sisal and love your patio makeover. But, what really caught my eye was the 4 generations living under one roof. We are 3 generations living under one roof and I can totally relate with you on the craziness that can occur. I am so loving reading your blog…….
Thanks Cathy! That is fantastic you are three generations living together. Isn’t it crazy!? My son really loves it and we do as well……most of the time 🙂 hehe.
Oh my goodness, can I come over right now? So lovely! Hope you’re getting lots of use out of this gorgeous project.
Thank you Erin!
Hi, for cost you put $275 for lattice and Restore. I find Restore in 4 gallon buckets is $90 and you mentioned you used 23 gallons, so that would mean you used 6 buckets. According to my calculations that puts this project around $540 just for the product, not including the roller and price of lattice. My guess is project is more like $600, still not bad price but more than double what you listed. Am I missing something?
Hi Deb! I take my gramp with me for purchases because he gets a discount being a veteran 🙂 My dad also had some product left over from the basement project so that helped with the cost. So no, you are not missing anything 🙂 Good luck with your project!
You have a gorgeous porch. I’m so jealous.
Thanks Michelle! I wish this was my porch. It’s a model home at my dads work that we are building 🙂
You’ve inspired me to redo my patio myself! But the numbers don’t seem to be adding up. From what I can see, each 4-gallon bucket is about $80 and if you needed 23 gallons, that’s about 6 buckets, or $480, yet you said the total cost of this project plus the lattice privacy screen was about $275. Am I missing something?
Never mind…I missed some of the comments that said the same thing!
Jessica,
We are considering using this product on our concrete deck, looks like it has been nearly 1 year sine you completed the project. How is the Restore product holding up? Any advice or recommendations?
Thanks
It’s held up well actually. We have a couple spots I need to touch up but that is because the patio gets shoveled in the winter from all the snow so it got a little scratched. Do more than one coat. I really am happy with how it survived. We have tough winters and I expect a little touch up each spring. Make sure you clean your surface really good prior as well. Good luck!
Thanks so much, one more question…does it seem hotter on the feet in the sun than your concrete was? Thanks again…
This sounds really exciting…….but does this mean you don’t have to repair cracks first?? , or is the material so thick that it fills in the cracks as you spread it?? thanks for your help.
It fills in some smaller cracks but not overly huge ones. The back of the container has instructions for cracks 🙂
Jessica, I love this and was considering using it. However, I’ve read some awful reviews. i’m in Texas and unsure how it will hold up to the heat, although our pool patio is covered with a pergola.
Has this held up through your summers/winters or have you experienced the peeling/bubbling that others mention?
My cement “patio” is cracked and uneven (badly), will this work for a repair like that?
Hi Jessica – I just found this tutorial and I’m very curious – how is the Restore holding up after 2 years? Do you still love it? Have you had any problems? Thanks so much!
Old paint needs to be removed and new paint on. some thing that is not slippery and not to course, easy to walk on and not slip
I love this. I makes such a big difference. So many want to tear up old concrete and replace it when there are so many things you can do to repair it and make it look new again. If your patio is ever uneven, consider lifting it instead of replacing it!
I was/am considering this product but it gets horrible reviews for longevity …. How is your holding up? It’s now 75$ for four gallons which makes it a very expensive product to gamble on.
Dose it still look good?
It did until my dad went over it with the snow blower tires. It ended up pulling up some of the repair work. It does say not to drive on it with tires so it was our fault. There are some areas that also have come up over the past 4+ years but that part of our patio was in really bad shape so I am not surprised, the under surface needs to be VERY clean and not deep with debris (which ours was). We are going to do some minor repairs next summer to it 🙂