

Our Stone Fireplace Makeover DIY {stage 1 framing}
Article may have affiliate links. If you make a purchase, I may earn a tiny commission at no extra cost to you. Big thanks for supporting my small business.
Today I am sharing, how to cover a stone fireplace makeover DIY – stage 1 framing! Do you have a 1970’s stone fireplace that is dated and ugly? A stone fireplace that happens to have a gold trim around the fireplace insert? If the answer is yes, this project is for you! I am going to show you how we framed around the existing stone fireplace with 2×4’s and added a wood fireplace surround on the hearth and mantel.
Fireplace makeover Ideas 2021
So many people are opting to remodel their existing homes as the housing market is out of control with homes selling for 10’s of thousands of dollars over asking price (see Jim’s house that sold for 80K over asking price if you don’t believe me) With the low housing supply and increased demand, homeowners are opting to remodel their home and stay put.
This DIY fireplace makeover project took place in our previous multigenerational home that I shared with my parents right up the street from our current home.
70s Stone Fireplace Makeover
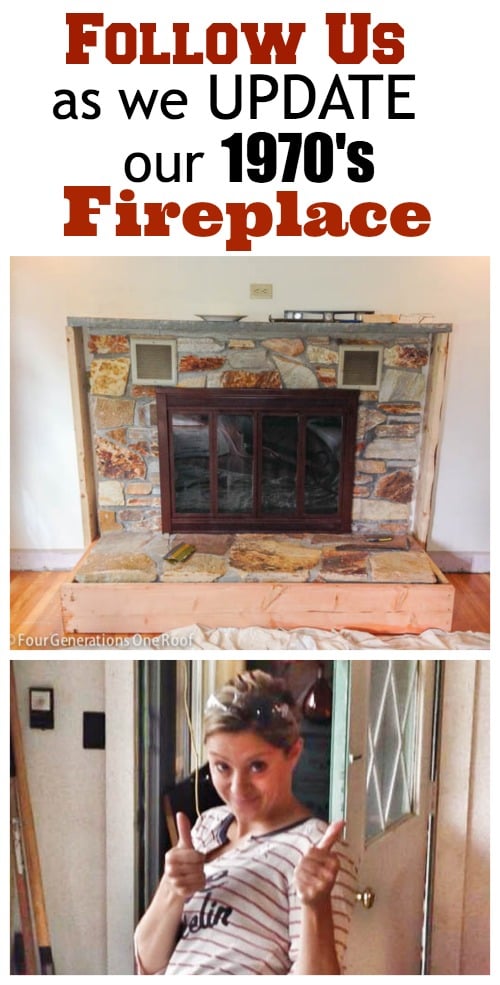
As you can see below the stone fireplace was indicative of the 1970s era. The fireplace picture below shows a dark brown fireplace insert (I painted it the year before with high heat paint to cover up the previous brass color) which was part of of the fireplace makeover – updating a brass fireplace surround.

My dad and I did this fireplace makeover project together and most of the time, I need show him inspiration pictures of my ideas. My dad is a visual person (I am too!) so I showed him probably a dozen fireplace makeover ideas that would work for our stone fireplace.
This is an Instagram picture below that I shared during the project and note the hashtag – #dadsannoyed ! -ha

How do you modernize an old fireplace
The first step to modernizing or updating our old fireplace was to remove the baseboard on the wall that abutted the fireplace.

Next, we started by framing the bottom fireplace hearth area with 2 x 10’s which created a box around the stone. The 2×10 lumber (box) will allow us to nail the finished pine wood over the stone heart.

We essentially boxed in the existing fireplace hearth.

Of course, it rained the entire weekend we worked on the fireplace so we setup “shop” in the garage which is where my grandfather parked his car.
For those of you who remember my grandfather (he and my gram lived with us for almost 8 years before they passed away) I think he told me 15 times, I better clean up the mess to his liking. My grandfather was awesome but man, he could be painful at times! -ha.

DIY Fireplace Makeover Ideas Tips
There are so many ways to make your fireplace look better or more modern. Whether you have brick or stone fireplace, you can always cover it up! You can cover it up with paint, shiplap, finished pine, or even tile. You may need to remove the existing stone or brick depending on what fireplace design you pick but for our project, we just went right over the existing stone.
To keep the cost down, we decided the new fireplace would have a complete wooden surround with the existing stone remaining on the hearth.
We used 2 x 10’s below to create a studded frame around the edges.

Whether you are updating your stone fireplace with shiplap, pine wood, stone veneer, paint the stone or a fireplace refacing kit, you need to check with your local fire codes prior to renovating or working on any fireplace.
This was step one of our DIY fireplace makeover.
Be sure to check out (click the following links) step 2 – DIY fireplace framing around heat vents, Step 3 – covering the stone fireplace with wood and step 4 – the before and after DIY stone fireplace makeover (final reveal).
I am very curious how many of you have a stone fireplace that has ugly outdated brass? Have you ever tackled a fireplace makeover on your own before? This was our very first fireplace makeover project and have since made over our fireplace at our current house. You can see how we removed a large “cold looking” granite mantel and replaced it with a gorgeous custom wood mantel made from a piece of yellow pine that was in our barn! It’s gorgeous and a must see :). Be sure to check out our new DIY fireplace makeover page where you can find all of our fireplace makeover projects.
More Fireplace Makeover Posts
- how to remove a stone fireplace mantel
- repurposing a historic beam as a fireplace mantel (see how we stained the yellow pine wood and created a new fireplace mantel)
- how to install a heavy wood beam fireplace mantel
- DIY fireplace makeover with paint (see how we painted the stone fireplace at the ranch flip house)
- How to cover a 1970s stone fireplace with wood paneling (see how we covered our dated fireplace at our previous house with wood)

Meet Jessica
What started as a hobby, Jessica’s blog now has millions of people visit yearly and while many of the projects and posts look and sound perfect, life hasn’t always been easy. Read Jessica’s story and how overcoming death, divorce and dementia was one of her biggest life lessons to date.
What a laugh — thank you for sharing. It’s not about the fireplace. It’s about family. I don’t know how you do it, but I really enjoy reading your blog. You all should live in the White House and show the rest of us how to get along!
Thank you Joyce. If you could be a fly on the wall you would probably laugh 🙂 We may brawl but at the end of the day, all is good! You are right, I often think during these DIY projects how lucky I am that I have this opportunity to hang with my family doing this stuff together. If it wasn’t for this living arrangement, none of these memories would be created 🙂 Glad you like following along!
We have something similar with exposed vents. Is it possible to share how you are dealing with the vents? I would love to redo our’s, but not sure how to deal with those safely. Thanks! :0)
Did you screw the boards into the rock/mortar? It doesn’t look like it. We have a very plain fireplace that is covered with off-white tile. It would be simple to frame because it’s very symmetrical. But, I’m concerned if we would need to screw boards into the tile/grout. I think they take screws but I’m not sure.
No, we built a frame all around the fireplace out of wood. We did not nail/screw to any rock/mortar. You can see all of the steps here, step 2 https://www.fourgenerationsoneroof.com/2013/10/diy-fireplace-makeover-framing-vents-part-2.html , step 3 https://www.fourgenerationsoneroof.com/2013/11/fireplace-makeover-covering-stone.html and reveal https://www.fourgenerationsoneroof.com/2013/11/1970s-dramatic-fireplace-makeover-reveal.html .
How did you attach the frame and what did you attach it to? I keep seeing framing in front of the fireplace but never see exactly how it attaches.
we ran 2×4’s attached to the wall to make a “frame” and those 2×4’s are what the “front frame” attached to