

Complete 1970s Kitchen Remodel Before and After: Updating Our 70s House
Article may have affiliate links. If you make a purchase, I may earn a tiny commission at no extra cost to you. Big thanks for supporting my small business.
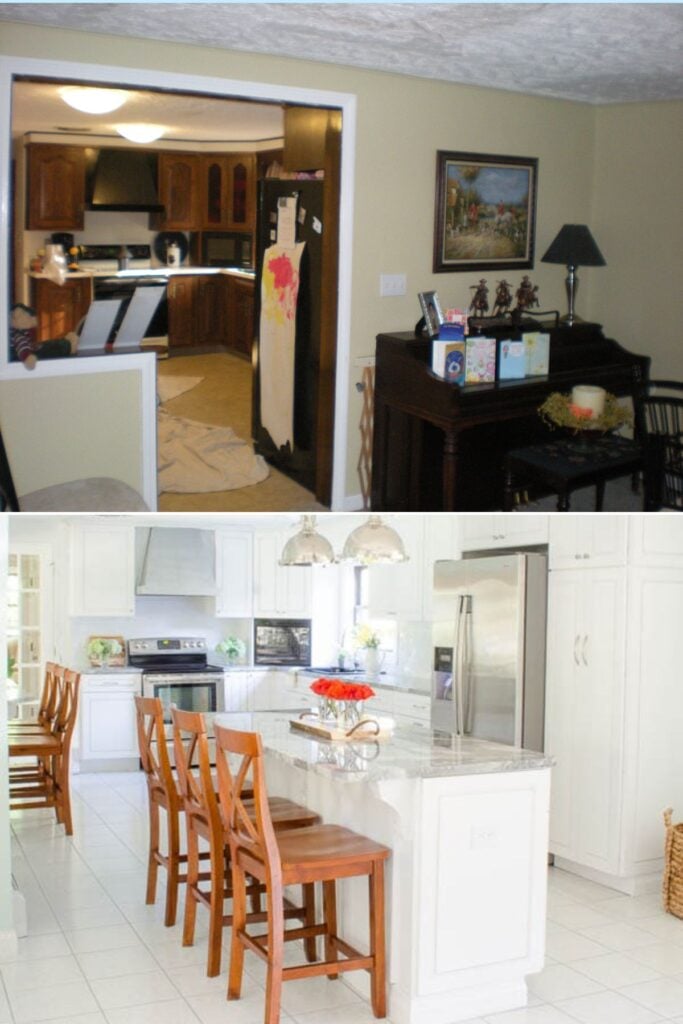
Our 1970s house renovation transformed this dark 70s kitchen from 220 to 500+ square feet, going from outdated brown cabinets to a bright white modern space. Here’s the full breakdown of costs, timeline, and kitchen renovation ideas before and after photos.
Before we get started though, this kitchen makeover is from our very first multigenerational home that started as my childhood home way back in the day! We lived our first 9 years as a multigen family from 2009 until 2018 when parents sold this home and we bought our 2nd (current) multigenerational home.
Ok, now back to the makeover!
Quick Stats: Our 70s Kitchen Remodel
- Original size: 220 sq ft – Final size: 500+ sq ft
- Timeline: 2 phases over 5 years (cosmetic update first, then full gut)
- Biggest game-changer: Removing the wall between kitchen and dining room
- Top challenge: Coordinating all the moving pieces (demo, electrical, plumbing, installation)
- Would we do it again? Absolutely—but we’d budget more time and money upfront
Today I’m sharing our complete 1970s kitchen remodel before and after and honestly, it’s hard to believe this is the same space.
Updating our 70s house took us from a cramped, dark cooking cave to a bright, open heart of our home that actually works for real life.
If you’re staring at your own 70s kitchen wondering where to start, stick around. I’ll walk you through everything—the good decisions, the “why did we think that would work” moments, and all the kitchen renovation ideas before and after that actually matter when you’re living through a 1970s house renovation.

It’s hard to believe that after all the dust, dirt, debris, and more dust and dirt this kitchen appeared before our eyes.
Holy smokes, I never thought we would see this day, but oh my, the transformation is incredible. I won’t bore you with endless explanations because if you’re like me, you want to see the results first and get the details after.
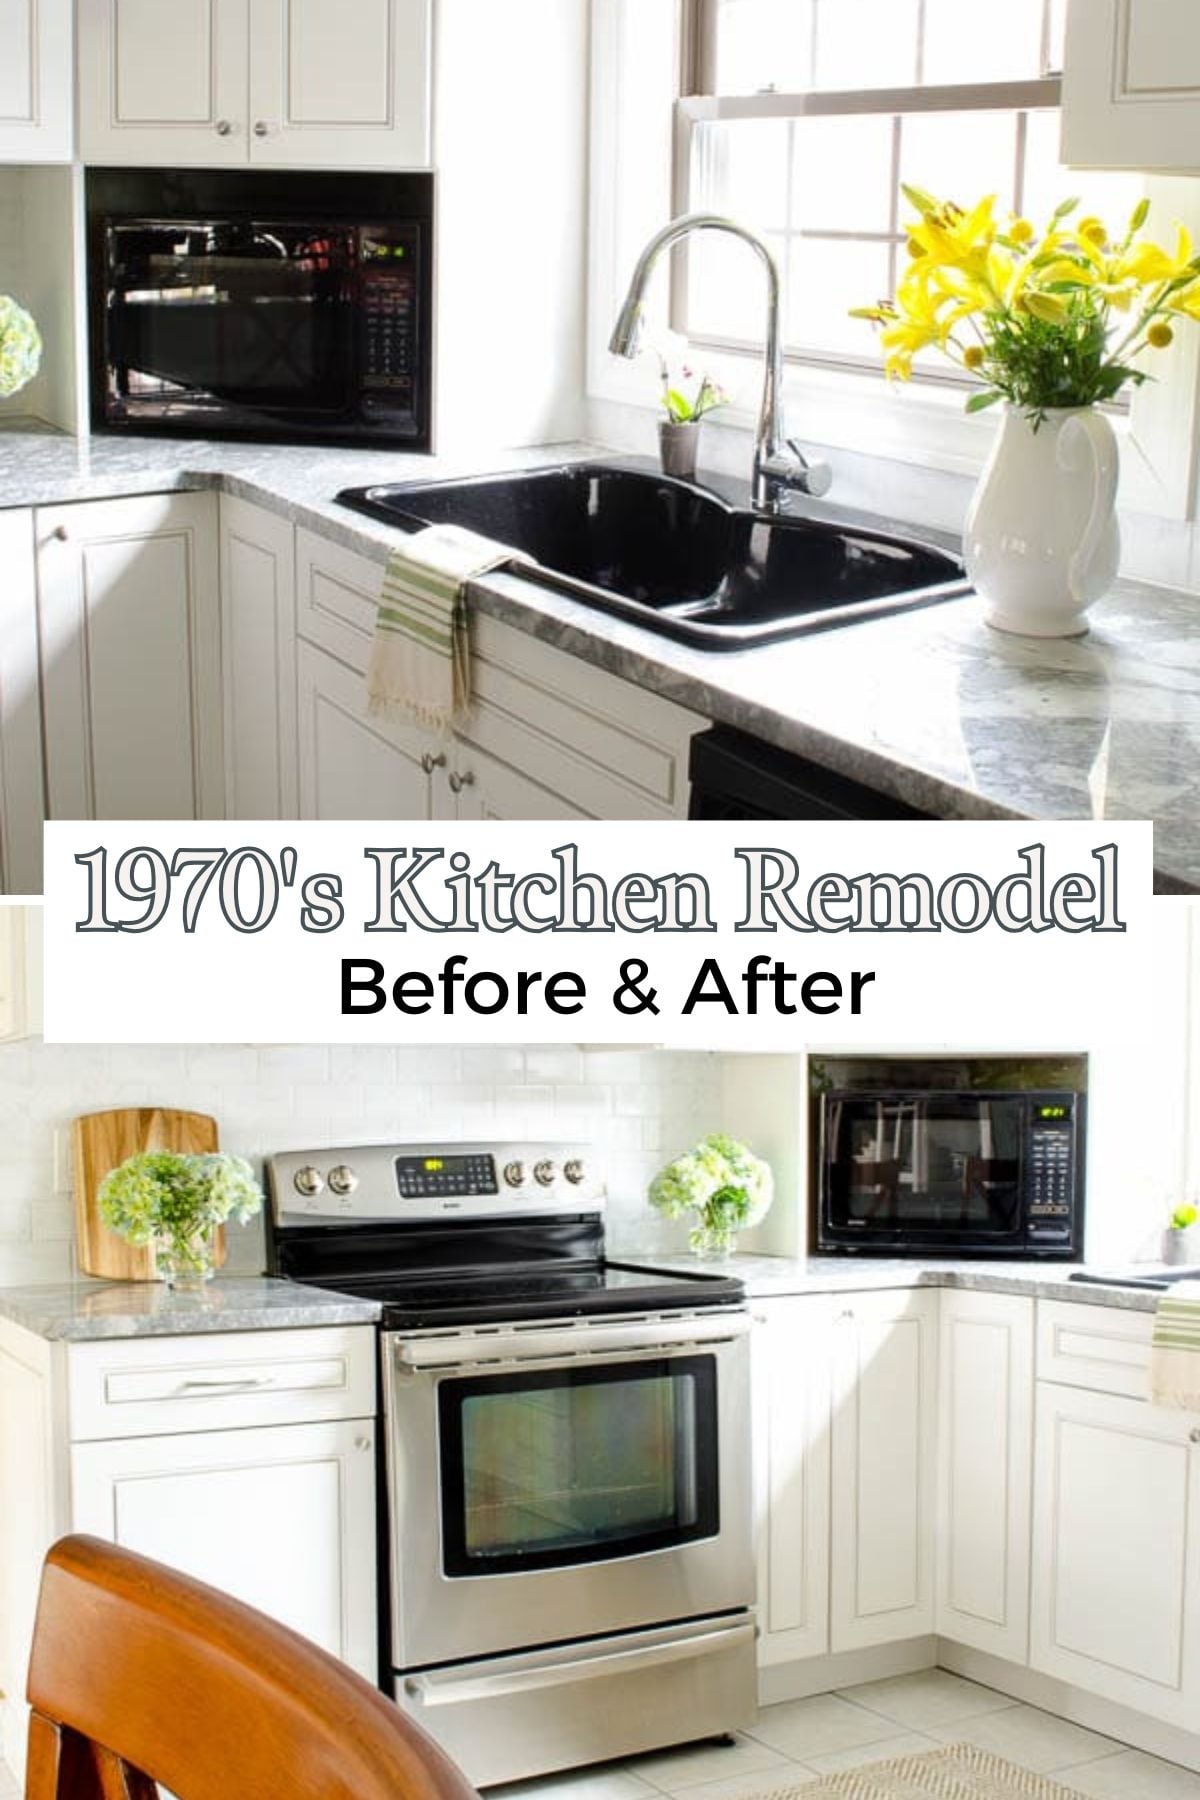
Kitchen Renovation Ideas Before and After: The Final Result
Here it is!
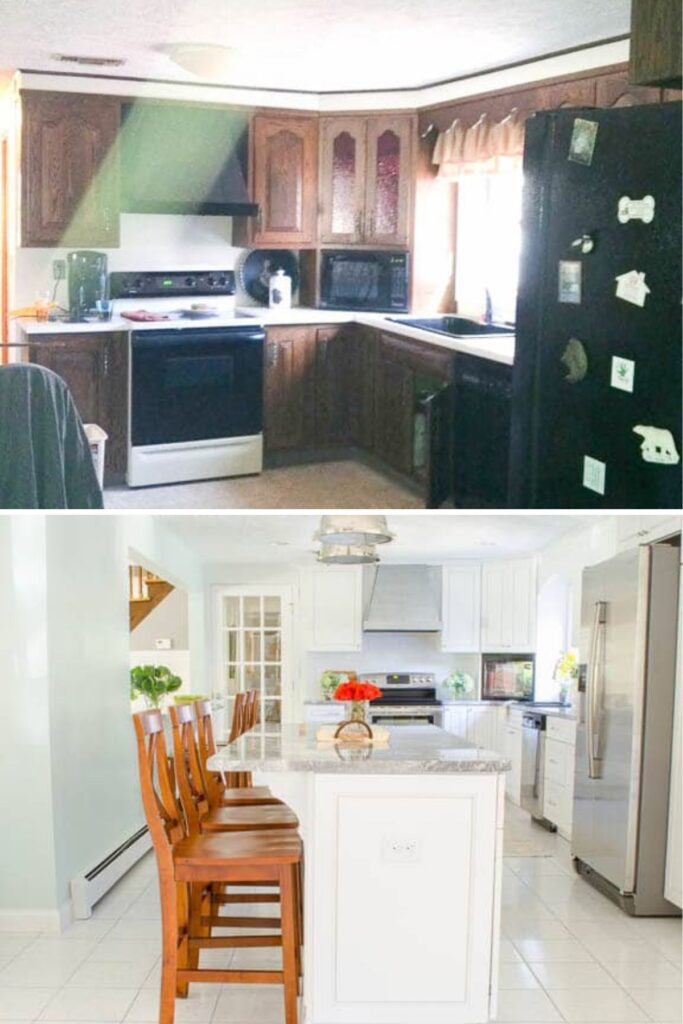
Can you even believe how different this light and bright modern kitchen looks compared to the 70s kitchen I grew up with?
This wasn’t just an update—this was a complete kitchen makeover that changed how our entire house functions.
When you’re updating a 70s house, the transformation can be absolutely dramatic.

This 1970s kitchen remodel before and after shows just how much potential these vintage spaces have.
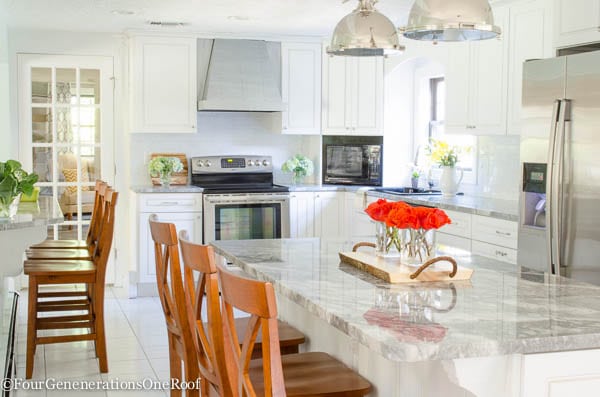
From the cabinets to the floor to the kitchen island to the countertops…everything changed, and we truly couldn’t be happier!

This white kitchen feels like stepping into a completely different house. The space actually breathes now.
Key Design Elements:
- Cabinets: Diamond brand white shaker-style
- Counters: Super White quartzite (gorgeous and durable)
- Pendants: Restoration Hardware Harmon Collection (here is a link to similar ones if you are interested in buying a more affordable option)
- Paint: Sherwin Williams Drizzle (blue-green that shifts with the light)
- Flooring: Large format tile throughout
70s Kitchen Remodel Before and After
For those of you who were adults in the 60’s and 70’s, you know this was in style and considered “the kitchen” to have. At least, that is what my parents tell me. I am not sure I believe them! ha.
The kitchen below is the one I grew up in, and have so many memories in this space. The kitchen is the most important room in the house for a reason, right?
So many memories!
Original Kitchen Problems:
- Size: Only 220 square feet (tiny!)
- Layout: Closed-off L-shape that felt like a cave
- Lighting: One overhead fixture and whatever sunlight made it through
- Storage: Limited and poorly organized
- Flow: Cut off from the rest of the house
Our Two-Phase 70s Kitchen Remodel Strategy
This 70s kitchen actually went through two major updates over five years. Here’s why we did it in phases for our 1970s house renovation (and what I learned from the process):
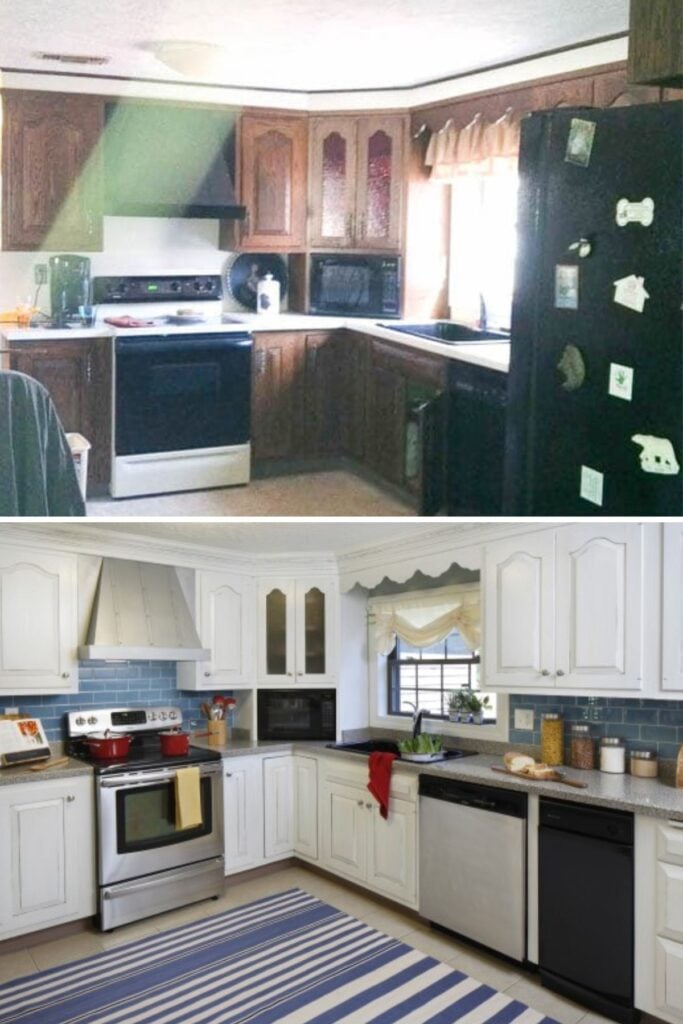
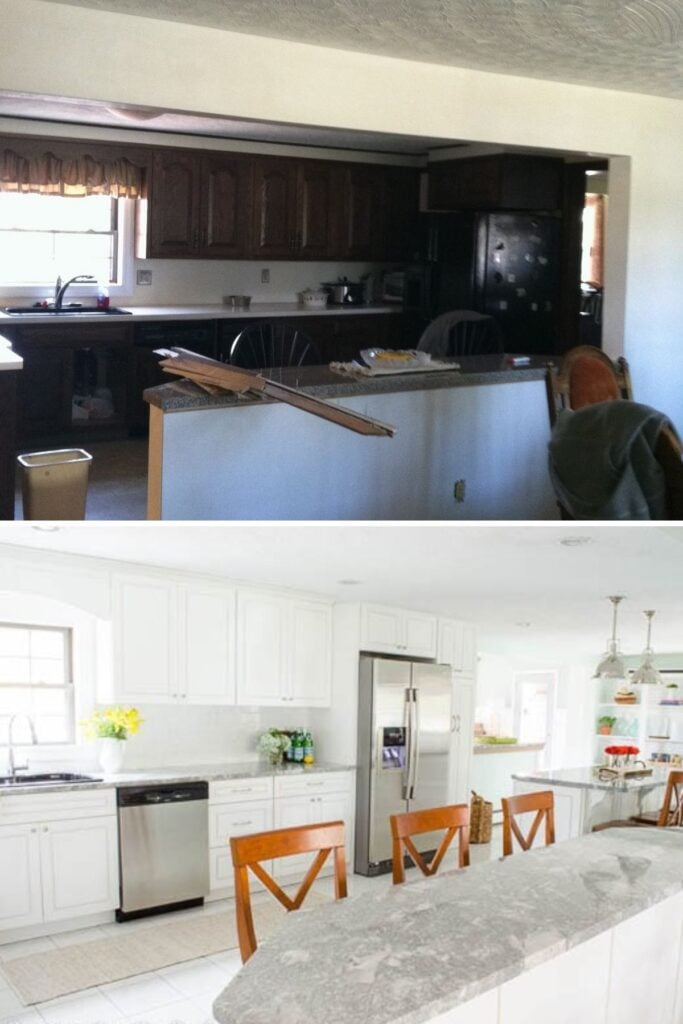
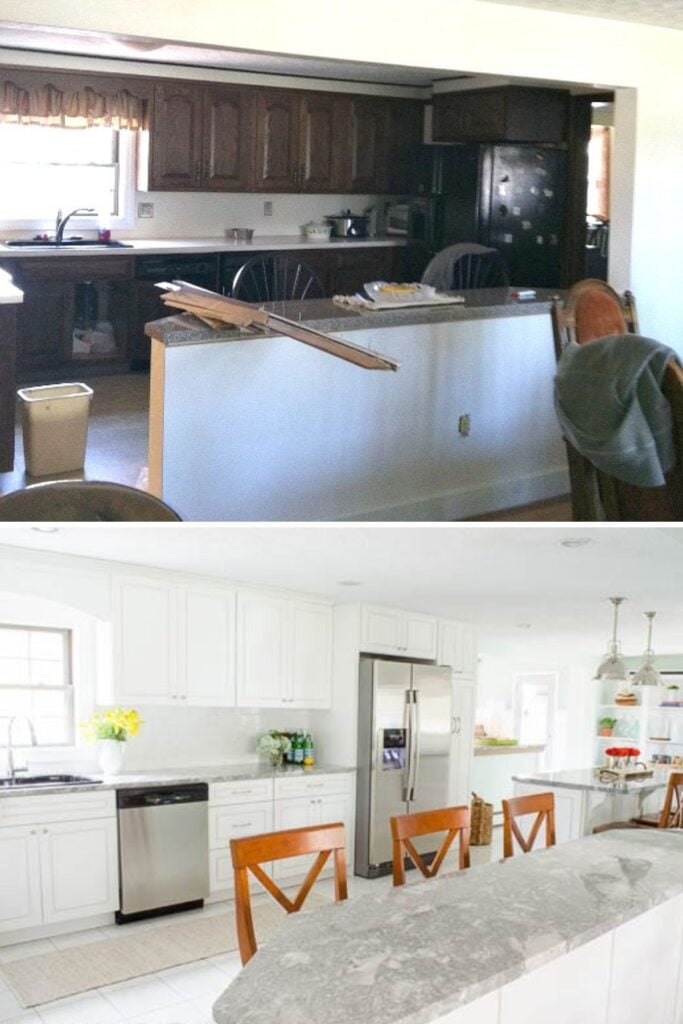
The first renovation was all about keeping the layout but painting the cabinets and installing new formica.
Our old kitchen was about 220 square feet. That makes it a pretty small kitchen: it was a simple, small L-shaped kitchen.
We kept the old laminate flooring, which saved a little money, and we were able to hide some of it with a large rug.
1970s Kitchen Remodel
This quick refresh was really lovely (see above – this was the first kitchen update), and I was happy with it at the time, but we always knew we wanted to give it a total remodel eventually.
So, 4 years after we did the refresh, we decided to do full gutt renovation and remove the walls, making the kitchen bigger and modern (see below).

Then we tore down this wall below, opening the kitchen up to over 500 square feet.
Kind of nice, right?
Design Decisions That Made the Difference
The Color Palette Strategy
I used Sherwin Williams Drizzle on the walls—a blue-green that shifts depending on the light. In bright sunlight, it looks almost gray-blue, but in evening light, the green undertones come through.

Why this color worked: It’s sophisticated enough to feel timeless but has enough personality to keep the all-white kitchen from feeling cold.
Cabinet and Hardware Choices
The Diamond cabinets in white shaker style were absolutely the right call. They’re classic enough to age well but have enough detail to feel custom.
Pro tip: We kept the hardware simple—clean lines that don’t compete with the cabinet style or countertops.
Countertop Decision: Super White Quartzite
This was one of our best decisions. Super White quartzite gives you the look of marble with way better durability.
It coordinates perfectly with the white cabinets but adds subtle veining that keeps things from looking flat.
Lighting Strategy That Actually Works
We installed 10 new recessed lights, which completely changed how the kitchen functions at night.

As my dad likes to say, “Now the light shines right off the top of my bald head!” But seriously—good lighting is everything in a kitchen.
The Restoration Hardware pendants add focused task lighting over the island and bring some visual weight to balance all that white.

If you are loving our Christmas kitchen above, be sure to visit this post, holiday kitchen decorating to see more.
What This 70s Kitchen Remodel Actually Involved
This was a complete kitchen remodel project: pretty much every single element of this kitchen had to change!
Here’s what actually went into this transformation:
- Replace the old kitchen cabinets (the Diamond cabinets are absolutely perfect)
- Install new appliances
- Install new flooring (I love these tile floors)
- Add pendant lights
- Change out the countertops (we also added a breakfast bar to the kitchen island
- Expand the kitchen
- Install a mudroom
- Add a fresh coat of paint
- Replace the backsplash
- Install new hardware of the cabinets
- Replace the kitchen sink
- Install task lighting
The Open Concept Game-Changer
Tearing down that wall was scary (what if we hated it?), but it completely transformed how we live in this house.

Before the wall removal:
- Kitchen felt like a separate, closed-off workspace
- Cooking was isolating
- Limited sight lines throughout the house
After opening it up:
- Kitchen connects to dining and family rooms
- Cooking becomes part of family time
- Space feels twice as large
- Better natural light flow
The visual connection makes the kitchen feel so much larger, and practically, it’s made family life way more connected. Isn’t it crazy what tearing down the wall did for this space?
Storage Solutions That Actually Work
One thing I’ll dedicate a full post to soon is the inside organization of these cabinets. The Diamond cabinets came with some great built-in solutions, but we added our own touches too.

Storage wins:
- Deep drawers instead of lower cabinets (so much easier to access)
- Pull-out organizers for pots and pans
- Dedicated spaces for specific tasks
- The island provides tons of additional storage
You can find my favorite pull-out kitchen drawers and organization solutions on our Amazon Storefront.
The Mudroom Addition: Unexpected MVP
Part of expanding the kitchen meant we could finally add a proper mudroom—and honestly, this might be my favorite part of the whole project.
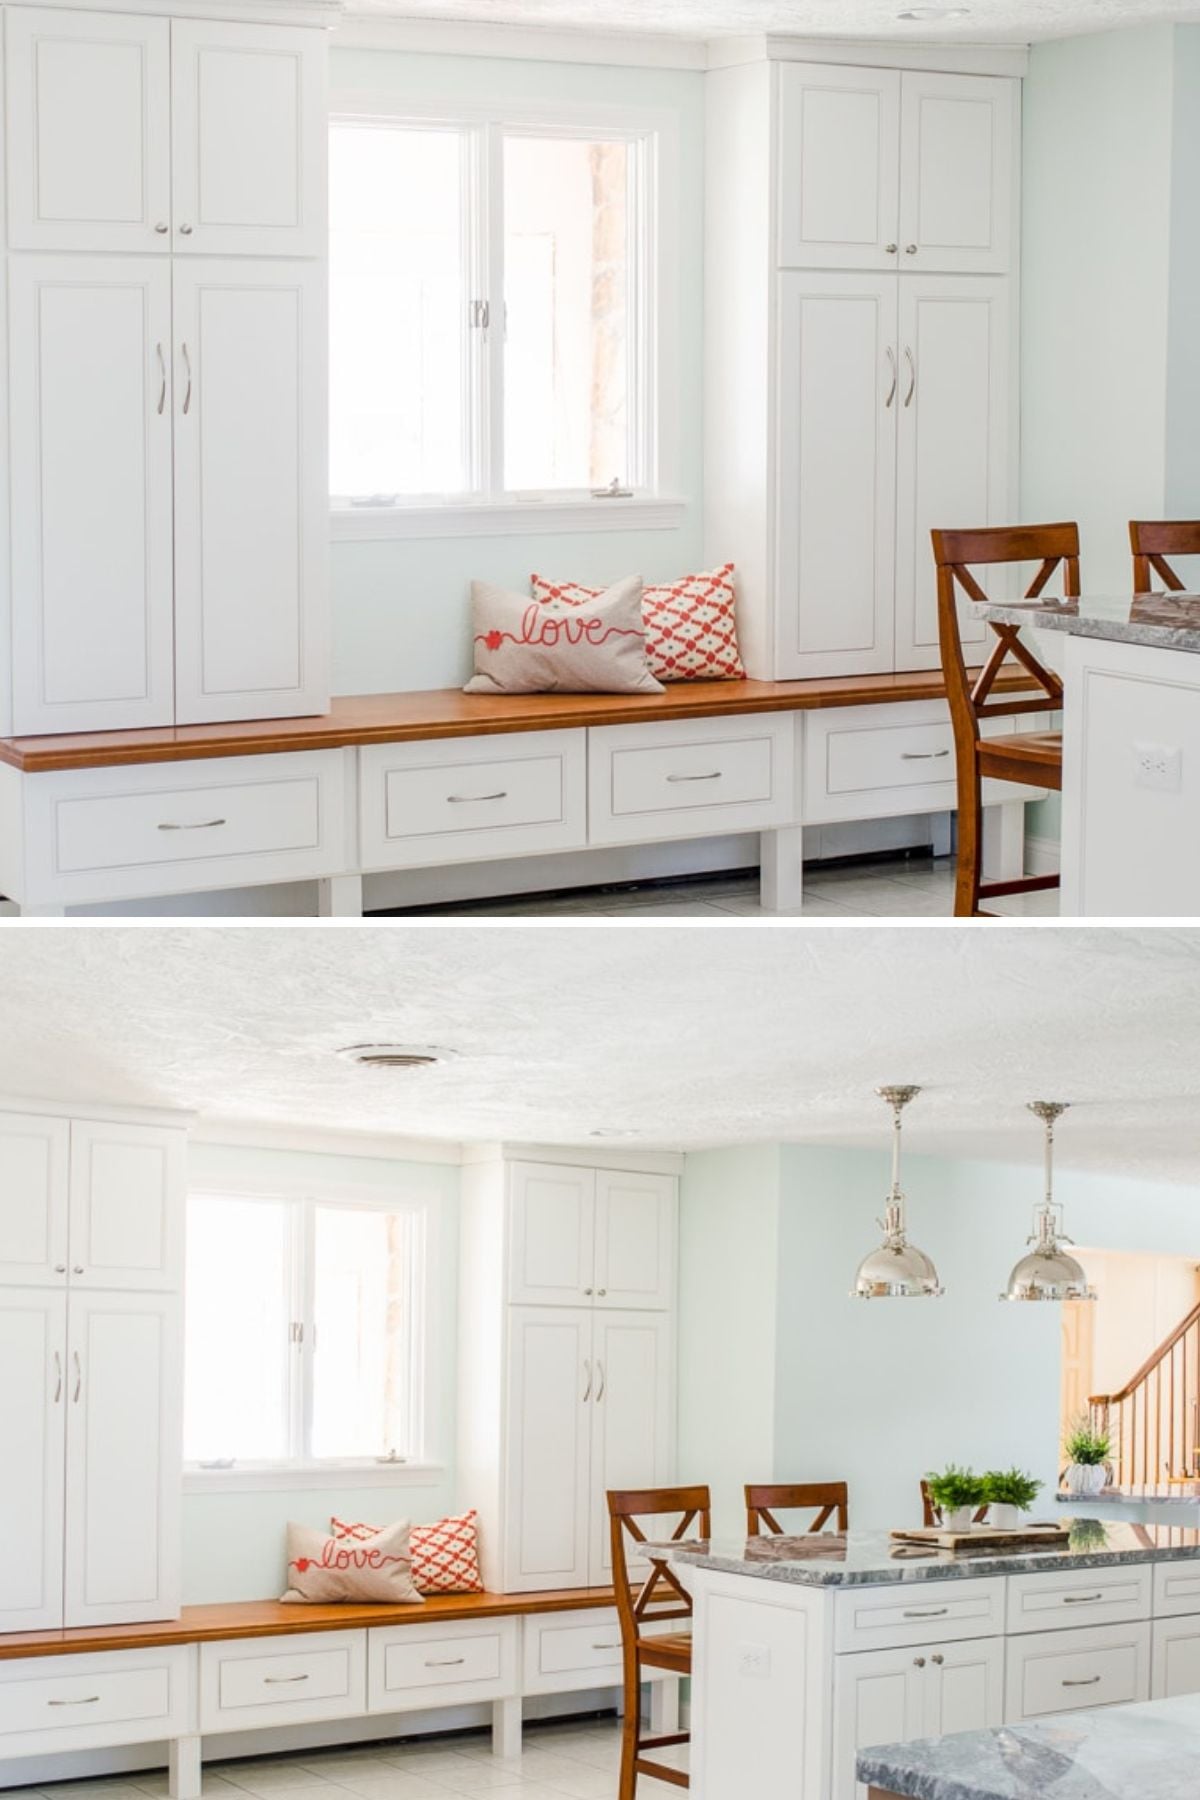
I absolutely love these barn doors! They’re both functional and beautiful—hiding the everyday chaos while adding warmth with that wood tone against all the white.
Mudroom features:
- Pull-out drawers for hats and mittens
- Coat hooks behind closed doors
- Bench seating for putting on shoes
- Connection to the kitchen that actually makes sense
Be sure to check out the full gorgeous mudroom makeover featuring pull-out drawers for hats and mittens and coat hooks behind closed doors!
What I’d Do Differently (The Real Lessons Learned)
Budget more time than you think: Even with good planning, everything takes longer than expected. Building in buffer time for your sanity is worth it.
The “while we’re at it” decisions add up fast: It’s tempting to upgrade everything while you have contractors there, but those little additions can blow your budget quickly.
Live with a space before the big changes: That first phase of just painting cabinets taught us so much about how we actually use the kitchen. When we did the full remodel, we made much smarter layout decisions.
Professional help for the big stuff is worth it: We DIY’d what we could, but wall removal, electrical, and plumbing need pros. Don’t mess around with structural or safety issues.
The Bottom Line: Was This 70s Kitchen Remodel Worth It?
Absolutely. This renovation changed how we live in our house—cooking isn’t isolating anymore, meal prep is actually pleasant, and we can find what we need. Most importantly, this kitchen works for real life.

If you’re tackling a similar vintage kitchen, the principles are the same: better flow, improved lighting, smart storage. The hard work is worth it when you end up with a space you genuinely love. Be sure to check out the entire reno series below.
More Of This Kitchen Remodel You Will Love
- See the Kitchen Before – Get the full story of our original dark, cramped 70s kitchen and why we knew it had to change.
- Delivery of Cabinets – Follow along as our new Diamond cabinets arrive and we prep for the big installation day.
- Ripping out old Cabinets – The demolition process and what we learned about the surprises hiding behind old cabinetry.
- How to choose kitchen cabinets – Our complete guide to selecting cabinets that work for your space, style, and budget.
- Installing the hood vent – Step-by-step process for installing a new range hood and the challenges we faced.
- Installing the new cabinets – Watch our Diamond cabinets go from boxes to a beautiful, functional kitchen.
- Kitchen Reveal {before & after} – You’re here! The complete transformation story with all the details.
- Christmas Kitchen – See how our new white kitchen looks styled for the holidays with festive touches.
- Kitchen Mudroom Wall – The mudroom addition that became our favorite part of the whole renovation.

Meet Jessica
What started as a hobby, Jessica’s blog now has millions of people visit yearly and while many of the projects and posts look and sound perfect, life hasn’t always been easy. Read Jessica’s story and how overcoming death, divorce and dementia was one of her biggest life lessons to date.