

DIY Lattice Privacy Screen to Hide Your Trash Bin
Article may have affiliate links. If you make a purchase, I may earn a tiny commission at no extra cost to you. Big thanks for supporting my small business.
Hate the sight of your trash bin? Check out our DIY lattice privacy screen to hide your trash bin! Not sure you want to make one, keep reading because I will share some sources below of where you can buy one. This trash bin project was one we completed at our campsite during our camping years and it was a great way to hide our trash bin on the side of our camper.
DIY Lattice Privacy Screen

The back of our camper faced the road and prior to the privacy screen, showed all the hoses, camper hookup supplies and random items. This was the first thing I saw when I pulled in and the first thing I saw as I would leave! It drove me crazy!

Seriously, who wants to look at a poopy hose when you pull into your driveway? Don’t get me wrong, I know it’s a necessity when you have a camper but certainly, it needs to be hidden!

RELATED: RV and Camping Adventures
As you can see, we made a cute little DIY privacy screen to conceal the garbage can and hoses.
First step, gather your supplies to make a free standing lattice privacy screen.
Supply List:
Advanced Abrasives SandBlaster™ Pro Sanding Sheet (medium grit)
Painter’s Tape
5 1×8 pressure treated boards cut to 36″ long (base/floor)
3 2×4 pressure treated boards (base) cut to 36″
1 lattice piece cut to 36″ wide x 42″ high
8 1×4’s to create lattice screen (cut to size)
Heavy duty stainless steel deck screws to create base
4″ toggle (heavy duty wood screws) to assemble screen to base
You can either cut your wood yourself or simply ask your local hardware department to cut it for you. Just be sure to bring your measurements with you. Most stores will do this for you as long as you purchase your lumber from them. The 3M safety glasses in the sunglass version are actually pretty cool looking and I found them easy to see through!

Place your 3 2×4’s on a table and lay your 5 1×8 boards across as shown below.
Note: we needed to cut about 1/2 inch off one of the 1×8’s to obtain the correct width. These measurements are to make a 36×42 lattice privacy screen. You will cut your wood to whatever dimension you desire.
 Once I was sure that they were all the correct length, I fastened the 1×8’s one at a time to the 2×4’s underneath using heavy duty stainless steel deck screws.
 Screw the boards slowly carefully and be sure to wear your safety glasses.

Trust me when I tell you, this is not a hard project. As you can see, all you are doing is screwing the 1×8’s to the base 2×4’s.

Framed Lattice Panels
Now that your base is complete, it’s time to assemble the lattice screen. Depending on what size privacy screen you are making, you may need to cut your screen with a skill saw. Always ensure that your safety eyewear is on. The vinyl pieces of the lattice fly everywhere!

Once your lattice is cut, you need to “sandwich” it between the 1×8 boards cut to size around the lattice. You will screw both sides to ensure stability.

This lattice privacy screen project was done when my grandfather was alive and he loved to be included in all of our projects.

Once you have your lattice screen completed, you need to attach it to your base.
 Looking good right? My dad’s version of a pout face. He is totally annoyed with me at this point due to the amount of pictures I have been taking. This project took about 3.5 hours to complete but he insists , I added on an extra hour because of the pictures. ha . He might be right ;).

Place your screen in front of your base and fasten with heavy duty wood “toggle” screws. We also reinforced with the decking screws as well.

Those black screws are the toggle wood screws. Most of them will come with the screw gun adapter so you can simply fasten them quickly.

See below, the big black toggle screws as well as the decking screws. This guy is NEVER falling apart!

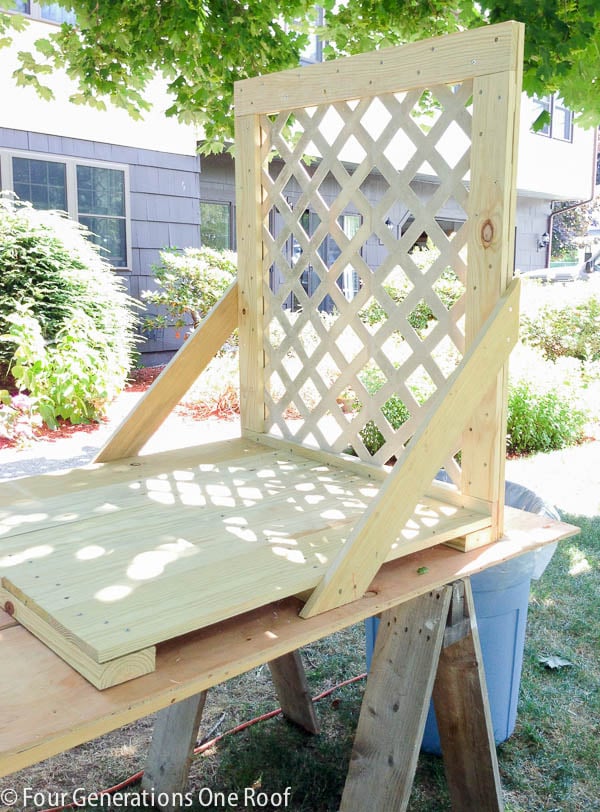
Freestanding lattice privacy panel
Because this is a stand alone piece and we didn’t have a place to fasten it to, we decide to add side braces cut on a 45 degree angle to each side. This prevents the screen from falling forward and getting top heavy.
 I used a medium grit 3M sanding sheet to smooth out the edges prior to staining. I added two coats of a cedar colored stain and 2 coats of an off white stain to cover the old lattice piece we had laying around. I did spray paint a coat of white primer on the vinyl lattice prior to adding the off white stain. The primer will help the stain adhere to the vinyl and prevent chipping.

I used the 3M™ Safe Release™ Painter’s Tape to ensure a clean edge where the lattice met the wood. It’s so much easier to take 5 extra minutes and tape the edges.
 What do you think? Not bad for a couple hours right?

The garbage can fits perfectly and the privacy screen hides the poopy hose from the driveway!
 So much more appealing!

RELATED: See how our AC units at our new house are hidden.
We did spruce up the area by spreading a yard of new stone and adding a few new planters. The summer season is almost over but the beautiful thing about this DIY lattice privacy screen is you can use it year round. It’s constructed of pressure treated wood so it will do fine in the natural outdoor elements and you can certainly use something like this at your home as well. I mean, we all have a garbage can or two right? I am sure if you think about it, you could find many purposes for this cute little screen and for a couple hours of your time, that bang is pretty good for your buck. This project cost under $125 which was mostly in materials. Be sure to check out this same project on our back patio where we built a large lattice privacy screen to hide our AC units on a budget.

Meet Jessica
What started as a hobby, Jessica’s blog now has millions of people visit yearly and while many of the projects and posts look and sound perfect, life hasn’t always been easy. Read Jessica’s story and how overcoming death, divorce and dementia was one of her biggest life lessons to date.
Love it Jess! Getting ready to do a Trashcan Corral over at Chaotically Creative as well. Trying to decide if we are going with galvanized.
Why so many pop up advertisement everytime I click on next page. Very annoying. Thank you for sharing although the popup videos on cooking a casserole were annoying.
oh geez!! Sorry about that . It must be something with the ads. I will let my tech person know!!