

How to Build a DIY Lattice Privacy Screen
Article may have affiliate links. If you make a purchase, I may earn a tiny commission at no extra cost to you. Big thanks for supporting my small business.
The patio on my parents’ side of the house had a front-row seat to two things: our AC units and a very ugly patio. My mom deserved better than that view.
So my dad and I built a fix. We made three DIY lattice privacy-screen panels for under $150 using 4×8 vinyl lattice sheets, 1×4 pine boards and exterior-grade stainless-steel screws. The basic method is simple: sandwich the lattice between two wood frames, connect the finished panels, and attach the installed screen to sturdy patio poles. No miter cuts, no fancy tools and about 4 1/2 hours from start to finish.
We constructed the panels as freestanding framed sections, connected them around the AC units and then attached the completed screen to the existing patio poles for permanent stability. More than a decade later, it is still one of the projects readers ask about most—especially how we kept it from blowing over.

DIY Lattice Privacy Screen at a Glance
- Finished design: Three connected framed panels
- Largest panel: 8 feet long
- Original project cost: Under $150 for all three panels
- Estimated time: Approximately 4 hours, 30 minutes
- Difficulty: Medium
- Lattice: Premade 4×8 white vinyl lattice sheets
- Frame: Painted 1×4 pine on both sides of the lattice
- Installation: Panels were built freestanding, connected, and then attached to the existing patio poles
- Cuts: Straight cuts; no miter cuts required
Why We Chose Vinyl Lattice
One decision to make before buying anything is whether you want wood or vinyl lattice. Wood lattice can look beautiful, but it needs ongoing painting, staining or sealing. I preferred vinyl lattice because it did not require the same finish maintenance.
We used 4×8 vinyl diamond-lattice sheets and framed them with painted 1×4 pine. The open pattern creates a visual boundary: it interrupts the direct view of the equipment without making that corner of the patio feel like a solid wall.
Lattice also allows more air to pass through than a solid enclosure, but that does not replace the clearance requirements for your equipment. If you are screening an outdoor AC condenser, check the installation manual for the exact model and preserve all required airflow and service space.
Materials and Tools
Materials
- 4×8 white vinyl/PVC lattice sheets
- 1×4 pine boards for a frame on the front and back of each lattice sheet
- Exterior paint for the pine frame
- Exterior-grade stainless-steel 1 5/8-inch screws for assembling the panels
- 3-inch exterior screws for connecting the panels and attaching the installed screen to the patio poles
We used premade plastic/PVC lattice from Home Depot. Products and prices change, so confirm the dimensions and specifications before ordering.
Tools
- Measuring tape
- Circular saw or another saw suitable for the pine and vinyl lattice
- Drill/driver
- Hammer
- Safety glasses
- Sawhorses or another stable work surface

How to Build a Lattice Privacy Screen
Step 1: Measure the Location and Plan the Installation
We needed three panels to wrap around the AC units, so we started with the largest 8-foot section and measured the two end panels to fit the patio.
Before cutting anything, decide how the finished screen will be installed. We built ours as freestanding framed panels, but we did not leave the completed screen unattached. After connecting the panels, we secured the installation to the existing patio poles for permanent stability.
If you are building around an AC unit, locate its model number and check its installation manual first. Clearance requirements can differ by model, by the side of the unit and by the type of obstruction. Your HVAC technician also needs enough access for maintenance and eventual replacement.
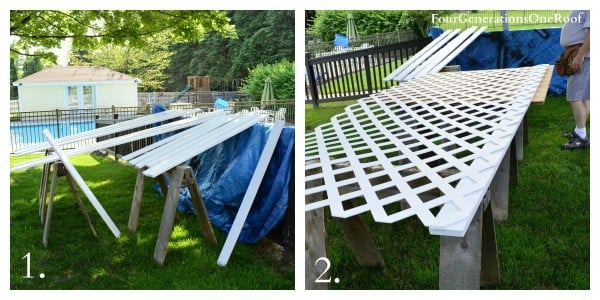
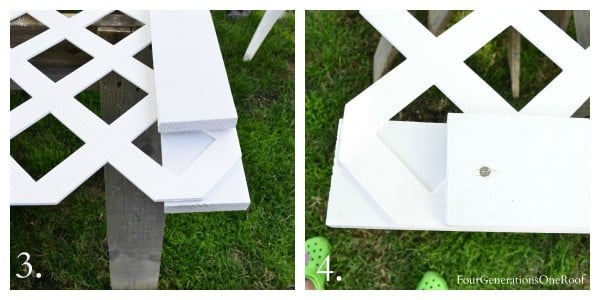
Step 2: Paint the Frame Before Assembly
Cut the 1×4 pine boards for the front and back of each panel, then paint them before adding the lattice. Each edge needs two matching frame pieces because the lattice will be sandwiched between them.
Painting flat boards on sawhorses takes minutes. Trying to paint an assembled lattice panel takes years off your life. Ask anyone who has tried.
Step 3: Cut the Vinyl Lattice
We bought the white vinyl lattice in premade 4×8 sheets instead of constructing the diamond pattern from individual strips. Measure the opening inside each frame and cut the lattice sheet to fit.
Support the lattice while cutting and wear safety glasses. Small vinyl pieces can fly as the saw moves through the sheet.

Step 4: Sandwich the Lattice Between Two Wood Frames
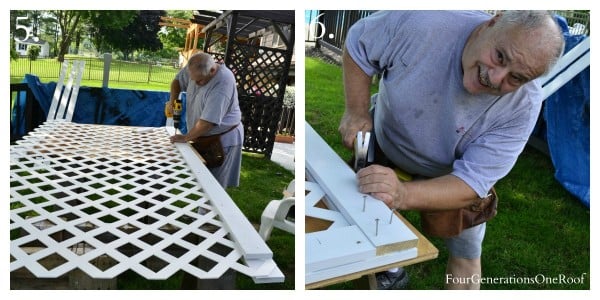
Here is the whole trick to this project: sandwich the lattice between two matching wood frames to create one finished panel.
Lay the first set of 1×4 frame pieces on a flat surface. Place the cut lattice on top, then add the second set of 1x4s over it. Two wood frame pieces on every edge, lattice in the middle. That’s it.


Use the 1 5/8-inch exterior-grade stainless-steel screws to fasten the two wood frames around the lattice. Work from the inside toward the finished side so the screw heads are less visible from the patio.
Don’t be shy with the screws, but stagger them around the frame instead of placing them in one straight line. This holds the full frame evenly and helps prevent the boards from warping.


Step 5: Connect the Three Panels
Follow the same sandwich method for all three panels. We attached the two smaller end panels to the large 8-foot panel using 3-inch exterior screws. This created the three-sided screen that wrapped around the AC units.

Step 6: Attach the Installed Screen to the Patio Poles
This is the step people ask about most. Although we built the individual sections as freestanding panels, we attached the completed screen to the existing patio poles. A large, lightweight lattice installation can catch the wind, so the permanent support matters.
Your installation method will depend on the screen dimensions, available structural supports, surface and local wind conditions. If there is nothing appropriate to attach to, use posts or a properly designed and braced base rather than relying on decorative lattice alone.


The Finished Lattice Screen
Much better, don’t you think? The AC units did not disappear, obviously, but they were no longer the first thing we saw from the patio. The white lattice also became a much prettier backdrop for the furniture, flowers and planters.


Why Privacy Screens Matter in a Shared Home
Here is the part of this project I did not fully appreciate when we built it: this patio is on my parents’ side of our multigenerational home. It is my mom’s spot.
When multiple generations share one property, visual privacy is not just decoration. It helps an outdoor space feel like it belongs to someone. The under-$200 screen gave my mom a patio that felt like hers instead of a utility zone where she happened to put chairs.
After 16 years of living this way, I can tell you that everyone needs a zone that feels visually theirs. Sometimes the structure can create that boundary without another family meeting or negotiation.
Sharing a Home or Property With Family?
Privacy, boundaries and separate zones matter just as much as the floor plan. Read the lessons I wish every family considered before combining households.
More Lattice Privacy Screen Ideas
The same framed-panel method can be adapted for other outdoor projects, but the support method needs to match the size and location.
- Portable screen with a braced base: See our freestanding lattice privacy screen for a trash bin.
- More styles and small-yard options: Browse these 12 DIY privacy screen ideas for small backyards.
- Planting around the finished screen: See how we grow hydrangeas in pots.
Printable DIY Lattice Privacy Screen Instructions
Use the printable project card below for the condensed materials, tools and construction steps.
DIY Lattice Privacy Screen

Build three framed vinyl lattice panels, connect them around outdoor AC units, and attach the completed screen to existing patio poles for permanent stability.
Materials
- 4x8 white vinyl/PVC lattice sheets, quantity based on your measurements
- 1x4 pine boards for framing both sides of each panel
- White exterior paint
- 8 × 1⅝-inch exterior-grade stainless-steel screws for assembling the panels
- 10 × 3-inch exterior-grade screws for connecting the panels and attaching the installed screen to the patio poles
Tools
- Measuring tape
- Circular saw
- Drill/driver
- Hammer
- Safety glasses
- Sawhorses or another stable work surface
Instructions
- Measure and plan the installation. Measure the space and determine the dimensions of all three panels. We started with the largest 8-foot section. Decide how the finished screen will be permanently supported before cutting anything.
- Cut and paint the frame boards. Cut matching 1x4 pine boards for the front and back of every lattice-panel edge. Paint the boards before assembling the panels.
- Cut the vinyl lattice. Cut the premade 4x8 vinyl lattice sheets to fit inside each frame. Support the lattice while cutting and wear safety glasses.
- Build each framed panel. Lay out the first 1x4 frame, place the lattice over it, and add the matching 1x4 frame on top. The lattice should be sandwiched between two wood frames.
- Secure the frames. Fasten the two frames around the lattice using #8 × 1⅝-inch stainless-steel screws. Work from the inside toward the finished side and stagger the screws around the frame.
- Connect and install the panels. Join the two smaller end panels to the 8-foot center panel using #10 × 3-inch exterior screws. We built the panels freestanding, connected them around the AC units, and then attached the completed screen to the existing patio poles for permanent stability.
Notes
DIY Lattice Privacy Screen FAQ
Attach the installed screen to structural posts or use a properly designed and braced base. We built ours as separate freestanding panels, connected them, and then attached the completed installation to the existing patio poles with exterior screws. The right support method depends on the panel size, surface and local wind exposure.
We spent under $150 total to make all three panels using 4×8 vinyl lattice sheets, 1×4 pine boards, paint and stainless-steel screws. That is the historical cost of our project; current prices will vary by location, panel dimensions and product availability.
Vinyl lattice needs less finish maintenance, which is why I chose it for this project. Wood lattice can cost less or provide a different look, but it generally needs painting, staining or sealing. Our vinyl lattice was still framed with painted pine boards.
Yes, lattice can interrupt the direct view while allowing more airflow than a solid wall. However, every AC installation is different. Follow the clearance and service-access requirements in the installation manual for your exact model, and make sure a technician can reach the equipment.
We connected the two smaller end panels to the 8-foot center panel with 3-inch exterior screws. Exterior-rated corner brackets may also work for some designs, but the completed screen still needs an appropriate permanent support or braced base.
We later added flower boxes to ours. One method is to fasten a removable water-catch tray to the top rail with exterior-grade stainless-steel screws, then place the planter inside the tray. Confirm that the frame and its permanent supports can safely carry the added weight.
Our original estimate for this three-panel screen was approximately 4 hours and 30 minutes. The final time depends on the number and size of the panels, the amount of cutting and painting required, and whether the installation supports are already prepared.
Save this tutorial for your next backyard project, then visit the complete list of small-yard privacy screens to find the right design for your space.

Meet Jessica
What started as a hobby, Jessica’s blog now has millions of people visit yearly and while many of the projects and posts look and sound perfect, life hasn’t always been easy. Read Jessica’s story and how overcoming death, divorce and dementia was one of her biggest life lessons to date.
Your lattice screen looks great! In fact, you whole patio looks amazing!
Thank you Kristi! Hope you are enjoying your summer 🙂
Jessica-you just made my day! This is a great project and please thank your Dad for giving away his “secrets” and thank you for giving such a thorough breakdown! We have {ahem} neighbors I could do without seeing and are putting in a pool next week so this project is totally on my to-do list now! Thanks again!
Melissa
Thank you Melissa 🙂 Good luck with those neighbors!
Wow! First of all, let me just gripe about builders and why they think it’s okay to just plop those horrific (but necessary things) right in the middle of everything!
Second of all – that turned out AWESOME! What a beautiful space you made for your Mom! I’ve seen people butcher “lattice privacy screens” before but you guys did great. Your Dad cracks me up!
On my way over to Sand and Sisal now!
Thanks for the tutorial!
Ha ha , thank you! 🙂
This looks great! We built a lattice covering for under our house last year and we were not smart enough to buy the pre-painted version. I’m glad you did because that stuff is NO FUN to paint.
No kidding, oh that must have stunk painting it! 🙂
That patio turned out awesome! And I love this screen! Definitely going to have to get my husband to help me make one for our unit outside!
Thank you Ashley!
It looks lovely! Tell your Dad all these people he doesn;t know appreciate him!
Thanks Jen!
Such an attractive patio solution! Your tutorial inspires me to camouflage a heat pump that is located right off the deck. Would you be able to tell how the planters are secured on top? What an attractive and functional idea you and Dad created. Thank you!
Hi Sonia, you can screw the containers from the inside (of the container) right to the top of your wooden lattice piece. Just use stainless steel screws so they don’t rust. You may want to use those containers that have the water catch at the bottom b/c they usually come off of the bottom of the planter so you could screw the water catch to the top and then place your planter inside. Hope that made sense 🙂
Please tell your father I say ” Thank you!” for sharing his secrets. I put together the first of two 8’x6′ screens on Friday and mounted it in place today. It looks great and my neighbor even came out to say so. I’m using them to screen off a small area of the yard where we keep our composters.
That is great Matt! I will pass it along to my dad 🙂
Do you mind me asking about the slats for the lattice? What did you use for them? It doesn’t look like regular 1 x 4’s from here.
thanks in advance.
Hi Deb, we used 1×4’s for the frame on the lattice. Is that what you are talking about or are you talking about the existing posts on the patio that we attached the lattice frame to?
I meant in the lattice itself. The 1×4’s I have seen are thicker, like 3/4″ and I was wondering if those are what you used, or did you use something from the trim section that is thinner.
Thanks in advance.
Hi Deb! We bought the lattice already assembled in a big 4′ x 8′ sheet. It’s vinyl lattice sheets.
Thanks. I see now how you did it.
Tell your Dad this was a great find and we really appreciate him sharing! Some daughters don’t have Dad’s nearby for yard makeovers! So we’ll “borrow” yours through the magic of the internet.
🙂
thanks for posting this..and say thanks to DADS too…. he is helping me get my hubby motivated !
ha thank you! 🙂
Is this just free standing? What keeps it from falling over? Im in Florida and we get some winds that would throw that across the yard! LOL! Just wondering what he attached it to
No, it’s screwed to one of the existing support posts for the roof. You can see it in the pictures if you look close 🙂 You would definitely need to screw the privacy screen to something to keep it from falling over. It’s big!
Love this project…NO MITER CUTS…It seems most bloggers have a carpenter for a husband..So although the projects are GREAT..we can’t RECREATE this is so do~able for everyone…Thanks!
No miter cuts on this one 🙂 Thanks for stopping by!
Tell your Dad he is super cute;-) he reminds me of my Dad. Just found your site and I love it! Thank you for sharing your creations!
MY HUSBAND AND ME DID IT WITHOUT LOOKING AT YOUR DADS SECRETS
🙂
hehe 🙂
Just wanted to say thank you for posting. I’ve been looking at purchasing vinyl fencing to hide our wood pile and garabge cans and your fence project is not only cheaper but better looking. Great looking patio as well.
Thank you , glad you like it!
What a fabulous project – and so budget-friendly. Thank you for the inspiration. I’ve posted this to Pinterest/homedepot on the “Garden Party” pinboard.
Thank you Renee! Glad you like it and thanks for pinning 🙂
Hi, Jessica. Love your idea and tutorial. Your Dad is a cutey! Thanks to both of you for tutorial. It is exactly what I am looking for, for the west side of my front porch. Nice wind breaker and nice to put some morning glories on. And the price of the project fits my pocket book just right. Have a great time in the new patio area!!
Thank you Patti!
Thanks for this tutorial! Two quick questions for Dad:
1. Can you explain how you connected the corner? Brackets or just screws?
2. I need to do this but need 3 panels horizontally (you had just one). How do I connect each panel to one another?
Thanks ‘Daddio’!
Hanna
We used screws but you could use corner/L brackets. Just make sure they are for outdoors and will not rust over time 🙂 Good luck!
You are so lucky that your dad is around !!!!! My dad was just like him. Your privacy screen came out beautiful.
Thank you Susan 🙂
This looks great…We have a 35×15 chain link dog kennel that I have been trying for so long to think of something creative and attractive to conceal it with. I think I just found the perfect idea for it. Thank you for posting this. Let your dad know he just helped you help another family!
Thank you for the step by step … very helpful. I too have “those neighbors” and maybe this might help my plight (waking up with garbage in my front yard). I will be building 6 of these and maybe they will get a hint.
You are hilarious! 🙂
This looks great, and you’ve made it so easy! My only question is: how do you prevent it from blowing over? is it attached to the ground or the house somehow, or is it freestanding? thanks in advance for your time!
Thank you Jennifer! The side posts are screwed to the wooden columns (that holds up the roof). It would definitely blow over if it wasn’t attached to something.You can always use cement screws (for outside) if you need to attach it to a cement patio:)
Thank you so much for the GREAT ideas love the pictures of your dad an projects . I use to work with my dad on projects so this hit home for sure !
That is great Katey you have done stuff with your dad. Great memories for sure 🙂
Wonderful tutorial and very clean photos. They help alot. I going to try making a small fence this summer. Thanks So Much! Delvalouisia
My son and I are going to attempt nstalling privacy lattice on our carport,(upper). Need any help you can give. Reetee
I was wondering how you all get along. Do any members of the 4 generations clash??? We have 3 generations in my house and the grandpa and the dad clash alot.
For the most part we all get along. My husband works over 70 hours a week so he is barely home and if anyone clashes, it’s me and my grandfather. We have moments where we butt heads but mostly, it’s ok 😉
Does your Dad have a tuitorial on how to build that plant stand on the patio? I need this privacy screen on my patio..as my neighbor’s shrubbery sheds on my patio all the time and makes such a mess.
Jessica-thanks for this tutorial!I’ve been thinking about this type of project and now I don’t have to reinvent the wheel:)
Thank you for this tutorial! My husband and I were able to use your project as inspiration for our own backyard, and shared your tutorial on our blog! Check it out! https://amberwegener.wordpress.com/2016/08/16/fun-diy-backyard-weekend-projects/#more-278
Your screen came out great Amber!!!! So happy you liked our tutorial 🙂
So how do I get the lattice screen to stay up? I’m going to try to build it to block out my neighbors who are loud and hoarders.
Great tutorial Jessica. As I write this comment the guys are here installing a new AC unit and I needed a way to protect it from my male dog that killed our last AC unit by lifting his leg on it all the time. You idea is exactly what I need to hide and protect my air conditioner. Thanks for great tutorial, yours came out great!
Oh no! Yes male dogs wreck tons of things with their leg and pee 🙁 Good luck and we love our barrier, we have since added window boxes filled with flowers to it 😉
There are SO many ads on this page that the article is literally unreadable on mobile 🙁
oh no!! I am sorry. I will look into that.
This came at the perfect time! I was asking my son about putting something up at the end of my patio to block my view of my neighbors. This is just what I wanted. Thank you so much. Tell your dad he was a big help and a lot of us out here wish we had such a great handy fella around.???? Hugs,
That is great Sandi! 🙂 Stay safe and healthy!
What are your thoughts on the pvc trim so the wood doesn’t need painted? We bought it to attempt a privacy screen on the side of our deck to block our neighbor’s windows but now I am worried it may bend or sag since pvc is a bit flexible and the screen will be a bit tall. Our deck railings are white vinyl so we have to zip tie the screen to hold it to the deck rail. Thanks!!!
We have used PVC trim before on other projects and loved it.
This looks really good and gives your mom a great place to relax without looking at AC units or garbage cans. Your dad is so funny! And it’s great that he can help you sometime.
Thank you . haah yes my dad makes me laugh 🙂