

Our DIY Wooden RV Steps
Article may have affiliate links. If you make a purchase, I may earn a tiny commission at no extra cost to you. Big thanks for supporting my small business.
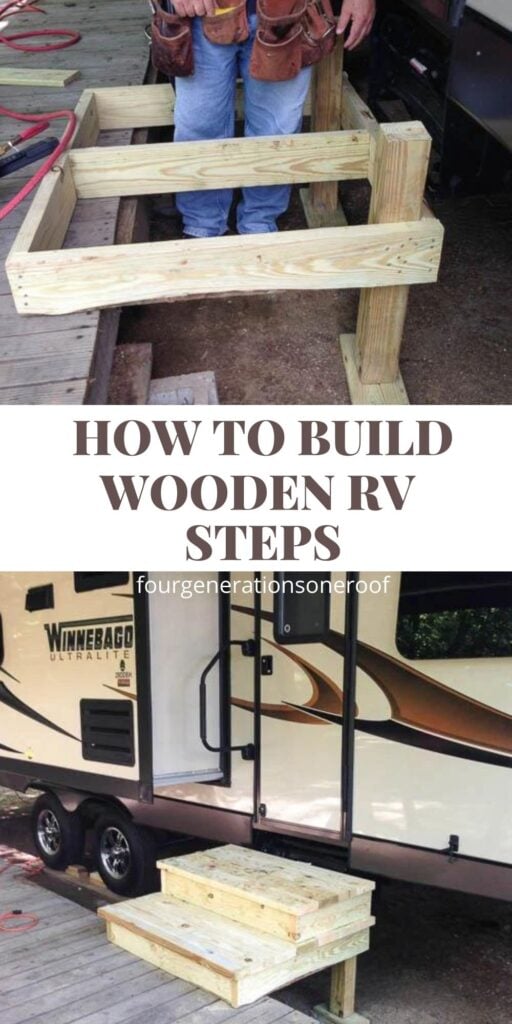
Wooden RV steps are easy to make and today I am going to show you a DIY project that you can complete in a weekend. If you have a travel trailer or any type of recreational vehicle, these RV steps with a landing will provide a durable entrance from your deck or ground level into your RV.
Building your own RV steps can save you money, provide a fun and rewarding DIY project, and can be customized to fit your specific needs and aesthetic preferences. In this blog post, we’ll guide you through the process of building your own wooden RV steps and show you how it can be a beneficial addition to your camping setup.
Wooden RV Steps
Lets get started on how to build wood RV steps with platform

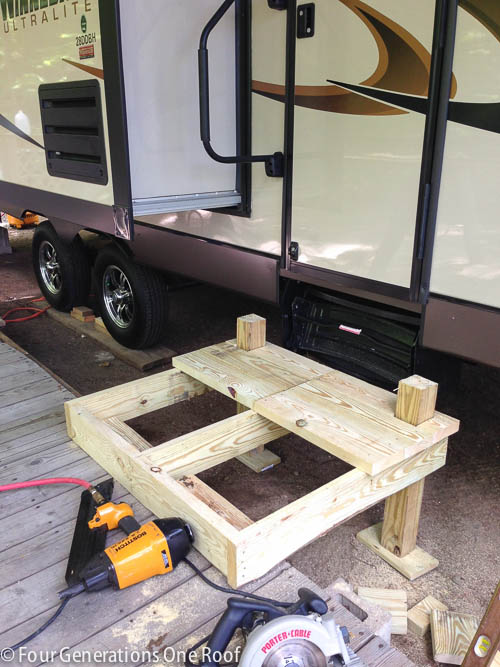
Our seasonal campsite had two existing decks, the one over the lake and this deck below where the camper sits.

First order of business was to address the gap between the deck and the entrance to the camper.
Our camper came equipped with metal stairs but because of the distance between the existing deck, they were not conducive to entering and existing safely. The gap was fairly large and the wooden RV DIY steps will look much nicer.
Materials needed:
- 2×6’s
- 2×4’s
- 4×4’s
- 2×10
- Outdoor nails and screws that are rust resistant
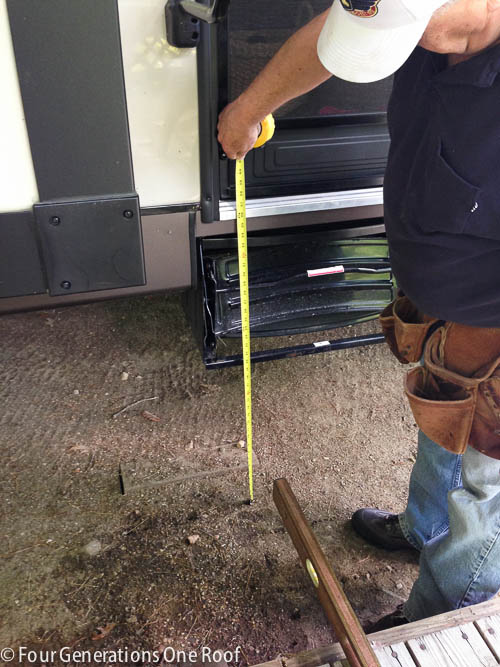
Step 1: Measure Stair Area
Measure how wide and long your steps will need to be. We used pressure treated wood to build our RV steps with a landing.
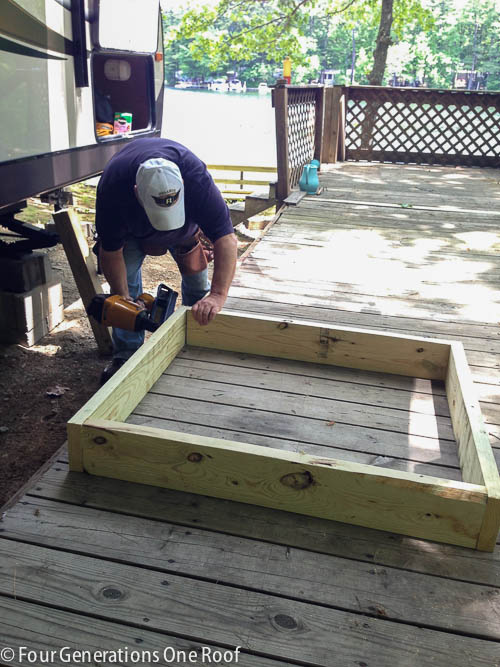
Step 2: Cut the wood
We measured how wide we wanted our stairs to be and then cut the 2×6 pieces of wood to length and nailed together forming a box.
I had no idea that steps are essentially “wood box steps for the deck” placed on top of each other. I guess I never really thought about the process before.
Step 3: Build the Legs
We then created “wooden legs” out of 4×4’s pressure treated wood. We decided to add a wooden brace (2×10’s cut to size) on the bottom of the legs because the ground was somewhat uneven and the wood allows for stability.
We fastened with 3″ nails and viola, cute little legs. You can also dig holes and use sauna tubes or a variety of different ways to stabilize your legs but for this project, we took the simple route and braced with wood.

We placed our “wooden box steps” where we wanted it on the deck and my job was to stand on it, to keep it in place. I thought my dad was kidding when he said, “stand on it.” Needless to say, I had to stand on it for about 30 minutes while he fastened it to the existing camper deck.

We added the wooden legs to the inside of the box and nailed together. You can also see that we added a wooden brace in the middle of the box to reinforce stability.
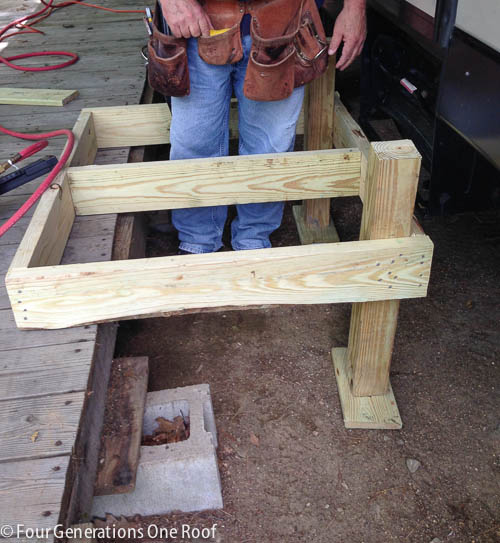
NOTE: See below that we also used cut to size “cleats” on the inside of the box to fasten to the existing deck. This allows you to nail the box to the existing deck as well as reinforce with screws.

Step 4: Build the floor of the steps
We used 1×6 pressure treated decking wood to create the floor. You will need to use a jigsaw to cut out the portion near the leg. We left a 1″ overhang around the edge as well.
Continue to add your flooring and nail on the edges and on the center brace.

Looking pretty good right? Repeat the same steps to build your second stair.
Once we measured how large we wanted our second stair, we created another box and assembled to the legs. See below, we also added cleats on the inside to fasted the box to the first stair. You can see, we made our second wooden box step smaller in order to create a 1/2 inch inset from the bottom.

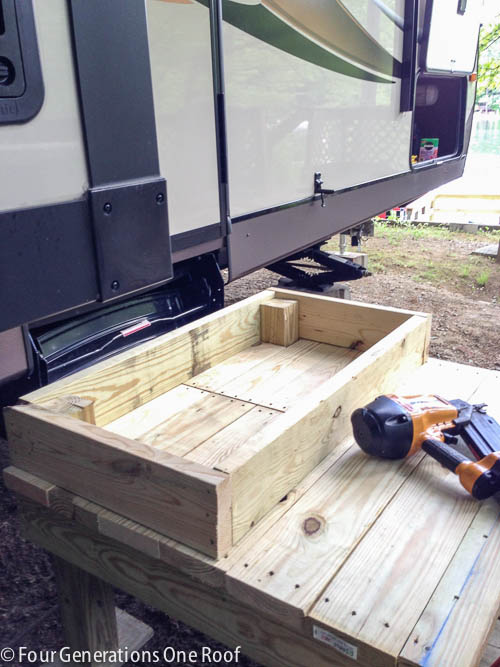
Add your floor and you are done!

Step 5: Paint or stain the camper steps
I love our wooden RV steps!

Here are the DIY RV wooden steps stained and looking so good!
Keep in mind, wooden rv steps with a platform are more of a permanent solution. They can be removed but our camper stays at our site year round so it’s not an issue for us. If you need to remove your camper steps often, you may want to consider the portable or metal collapsable stairs that I share below.

You can see the full camper deck reveal by clicking through here to see amazing full deck reveal {before and after}.
Where Can I Buy RV Steps?
If you don’t have time or the ability to make your own camper steps (or prefer portable steps), I have rounded up a handful of my favorites that you can buy!
We still need to stain the deck and stairs as well as add another foot of decking to the existing deck but slowly but surely, our summer lake project is coming along! It took us about 2 hours to build the stairs and now we need to build a smaller set for the back entrance door.

Meet Jessica
What started as a hobby, Jessica’s blog now has millions of people visit yearly and while many of the projects and posts look and sound perfect, life hasn’t always been easy. Read Jessica’s story and how overcoming death, divorce and dementia was one of her biggest life lessons to date.
Those look good! I can’t wait to see what you do with that deck once it’s all reinforced and fixed up!
Love it!!