

DIY Custom Tile Shower Niche That Fits Your Stuff (and Budget-Friendly Too!)
Article may have affiliate links. If you make a purchase, I may earn a tiny commission at no extra cost to you. Big thanks for supporting my small business.
DIY custom tile shower niche projects sound intimidating, but honestly? They’re not nearly as hard or as pricey as you’d think. After juggling clunky shower caddies and those plastic shelves that fall off the wall mid-shampoo, we finally built our own.
The best part?
It gave us total control over the size, layout, and style without dropping $1,000+ on a pre-made insert.
We pieced ours together with cement board, PVC trim, and leftover tile, and it turned out better than anything we could’ve bought.

Why Build Your Own Shower Niche?
A built-in shower niche adds serious function and style to your bathroom, but the prefab ones? Pricey. And often not the right size.
DIYing your niche lets you:
- Customize the dimensions to fit your wall studs and tile layout
- Save on labor (and markup)
- Match your tile for a seamless, spa-like look
- Add real value to your bathroom remodel without blowing the budget
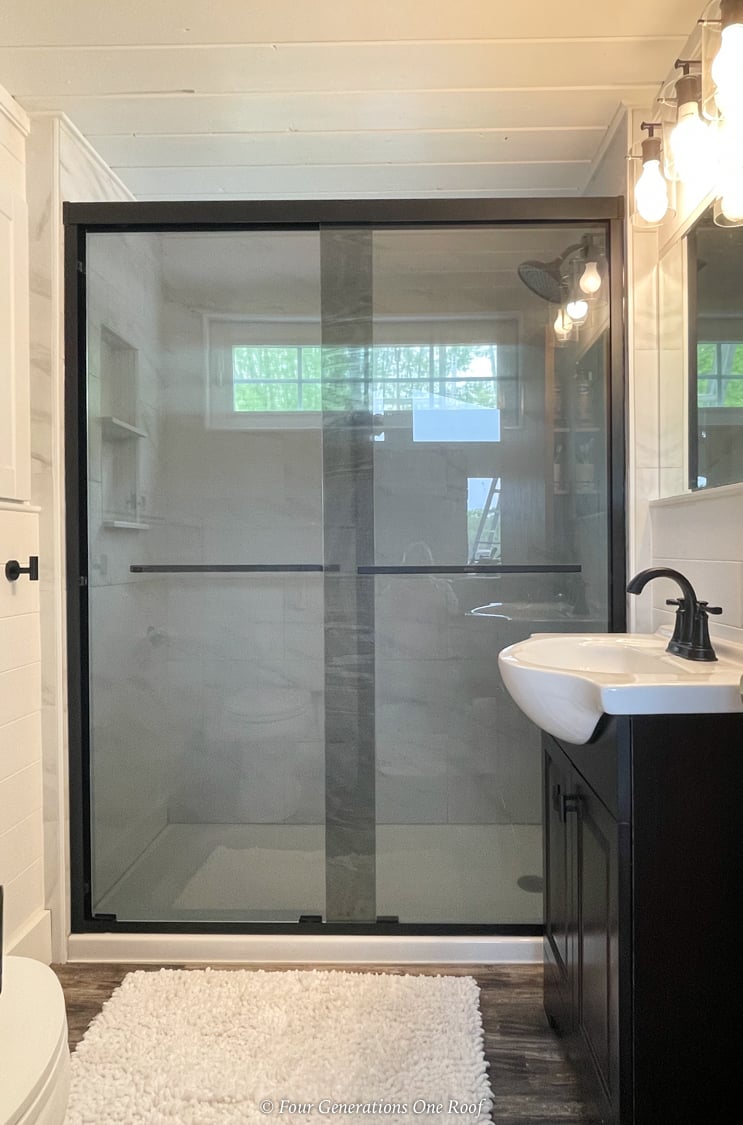
We built ours into a new walk-in shower at our lake house, and now every guest thinks it came with the house. (High praise for something made with PVC boards and a sawzall.)
Materials We Used
Here’s what you’ll need to build your own 14×20 shower niche like ours:
- 1×4 PVC trim boards (for the niche frame)
- Cement board (Durock or similar)
- Galvanized screws
- Loctite tile adhesive caulk (to seal joints)
- Leftover wall tile (we used 12×24 Kolassus White)
- Marble thresholds (cut down to size for shelves)
- Schluter metal trim (we used white)
- Mortar or thinset
Bonus: if you’ve already tiled your walls, chances are you have half of this on hand.
Step-by-Step: How We Built It
1. Frame the niche to fit your wall
We built the box first using PVC trim and galvanized screws, sized to fit snugly between the 2×4 studs. Ours ended up 14″ wide by 20″ tall.

Tip: Keep in mind your tile size and layout when deciding how big to go. You don’t want awkward slivers or grout lines that don’t line up.
2. Cut the opening in your cement board
Once the niche was built, we traced it onto the cement board and cut it out with a sawzall.

(Jim may have skipped his safety goggles here, and I may have made a sarcastic comment…standard renovation vibes.)
3. Back the niche with cement board
We screwed a piece of cement board to the back of the niche for durability and tile adhesion. This step is crucial. Don’t skip it.

4. Install the niche between wall studs
Slide the framed niche into the opening and screw it directly into the wall studs. Make sure it’s level!

Seal all seams (especially corners and edges) with Loctite tile adhesive to keep moisture out and your niche watertight.

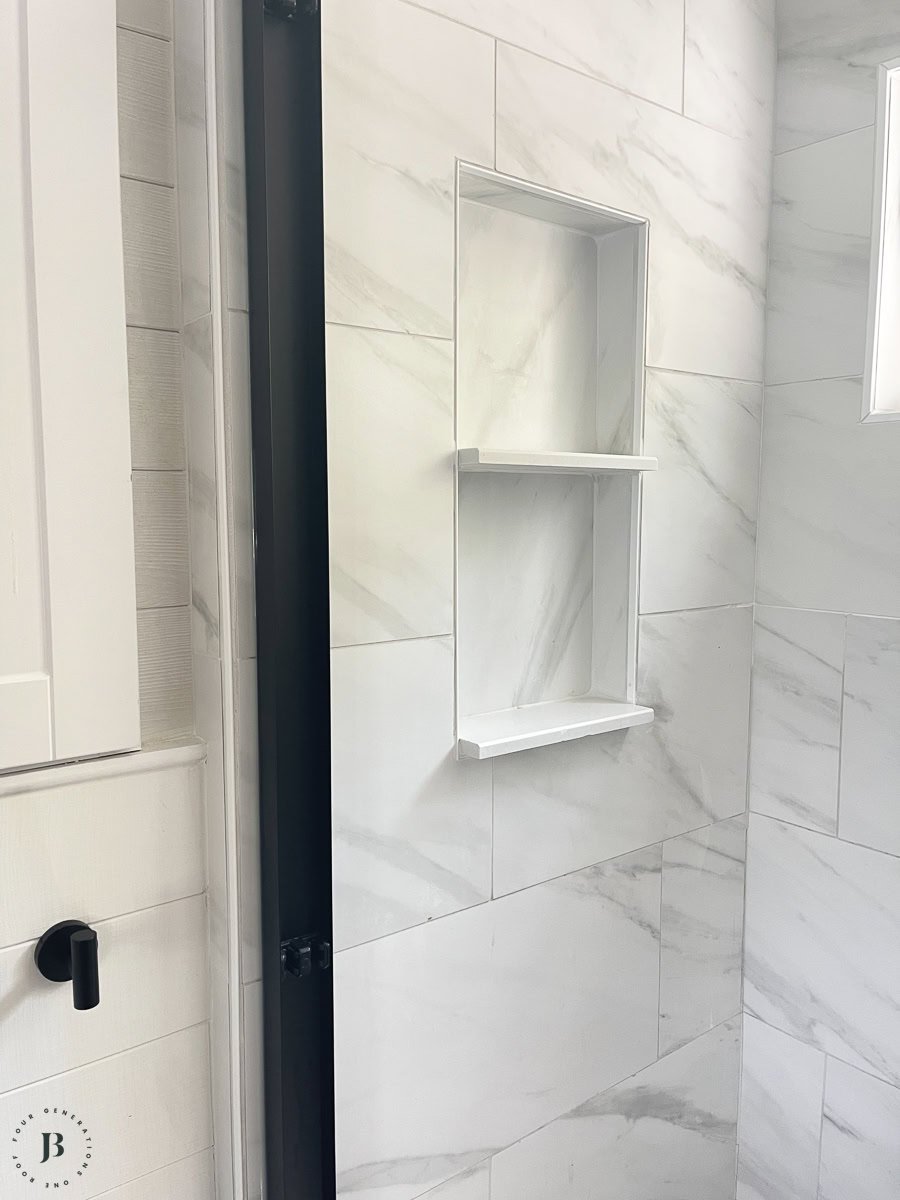
5. Add tile and shelves
We tiled the inside of the niche using the same 12×24 tile from the shower walls.
For the shelves, we used marble threshold pieces from Home Depot, cut down to size and set with mortar.
The finishing touch? White Schluter trim to edge the niche and keep everything looking crisp.
Related: Our lake house full bathroom remodel before and after
How Much Did This Cost?
All in, under $500.
- Most materials were leftovers from the main bathroom remodel
- Labor was free (thanks, Jim!)
- Pre-made niches with shelves and tile can run $800+ (and you still need to install them)
So yeah… this DIY version? Major win!
Is a DIY Shower Niche Worth It?
If you’re already in demo mode and feeling handy? Yes, absolutely. You’ll get a custom look, better use of space, and save serious cash.
But, if DIY isn’t in the cards, there are also some great pre-tiled niche inserts out there. Just expect to pay more, especially for anything with built-in shelves or designer tile.

Final Result: A Modern, Built-In Shower Niche That Blends In Beautifully
We installed two marble shelves inside the niche for shampoo and soap, and kept the tile flowing right through the space.
No bulky add-ons. No wasted corners. Just clean, functional design.
Would I do it again? 100%
If you are looking for more remodeling projects at our lake home, be sure to visit this page, “small Lake House Remodeling Projects.“
Be sure to check out our full shower tile installation guide for everything you need to know about remodeling a shower!
Common Questions
Not easily. It’s best to plan for it during the framing or cement board phase.
Use the same tile as your shower walls for a seamless look. Just be prepared to make smaller, more precise cuts.
Yes. Always seal seams with adhesive and use cement board inside to protect against moisture.
Whether you’re building a whole new shower or just giving yours a glow-up, a custom niche is a smart, stylish way to add storage.

Meet Jessica
What started as a hobby, Jessica’s blog now has millions of people visit yearly and while many of the projects and posts look and sound perfect, life hasn’t always been easy. Read Jessica’s story and how overcoming death, divorce and dementia was one of her biggest life lessons to date.