

Building Our 10×12 Storage Shed in a Weekend (Yes, Really)
Article may have affiliate links. If you make a purchase, I may earn a tiny commission at no extra cost to you. Big thanks for supporting my small business.
Everyone loves the after photo of a cute little 10×12 storage shed tucked by the driveway. Nobody shows you the part where the old one is literally sagging into itself and you’re wondering if it’s going to collapse while you’re inside grabbing the rake.
That was us!
We had an old shed at the lake house with a roof that was beyond “a little tired.” Jim tried to rescue it at first, started pulling things apart, and then hit that point every DIYer knows: this is not worth saving.

So we ripped it down, pushed the new footprint slightly back to create more driveway space, and decided to build a 10×12 storage shed that actually matched the house and didn’t feel like an afterthought.
This is how we built a functional, good-looking backyard storage shed in one weekend, complete with shed build photos, design decisions, and what we’d repeat (or skip) next time.
You Can Build a 10×12 Storage Shed in a Weekend If:
- Your design is simple
- You’re not reinventing the wheel with fancy rooflines
- You have at least one reasonably handy human and one person willing to fetch things and hold boards (hi, that’s me!)

But here’s what most people miss:
- The new shed doesn’t have to go in the exact same spot. We shifted ours back a bit and magically created more driveway space, total win for parking!
- Matching your house makes everything look higher-end, even on a budget. Same siding color family, similar windows, matching shingles, and suddenly the shed looks intentional instead of “plop, here’s a box full of junk.”
- Inside function matters more than Pinterest-perfect styling. Shelves at the right height and a simple solar light beat a thousand cute baskets you’ll never actually use.
Why We Tore Down Instead of “Fixing Up” the Old Shed
You know that moment when you think, “Maybe it just needs a new roof” and then you take one board off and realize, nope, the whole thing is a disaster?
That was the old shed.

The roof was collapsing, the structure wasn’t safe, and once Jim started pulling pieces apart, it was obvious the cost (and time) to rescue it would be silly compared to starting fresh.
We also realized the original placement hogged driveway space, the layout inside never really worked for lawn equipment, and any money poured into it would still leave us with an old, compromised frame.
Reality check: If you’re dealing with rot, sinking corners, and a roof that makes you nervous, give yourself permission to start over. It’s not failure. It’s just phase two!
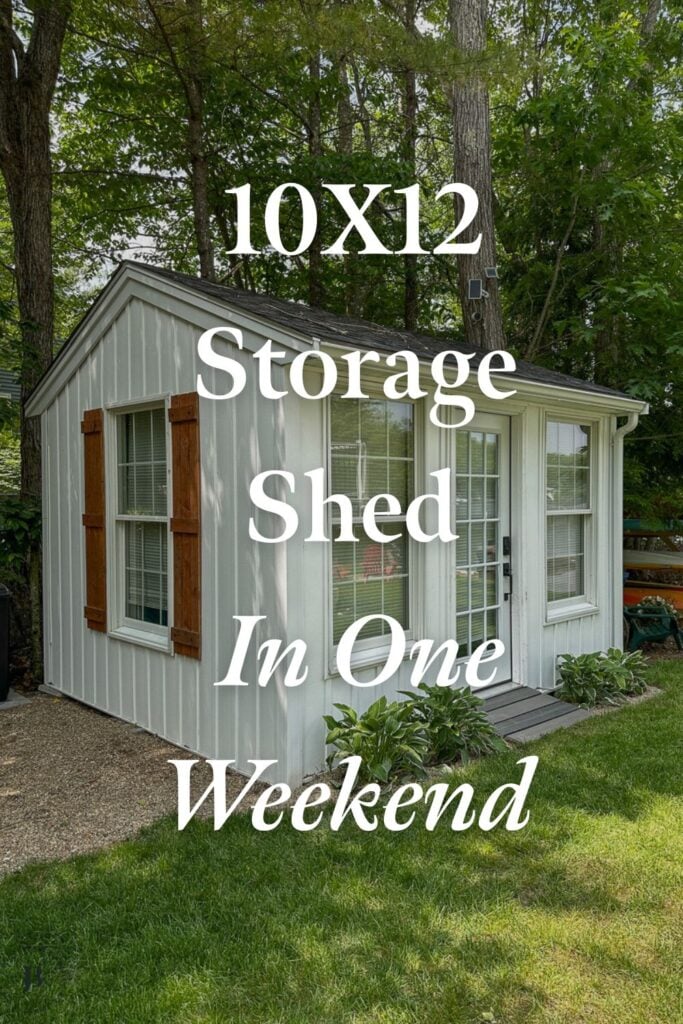
The 10×12 Storage Shed Plan: Simple, Cute, and Matches the House
We didn’t want a garden cottage with eight rooflines and a stained-glass window. We wanted: “holds the mower, looks good from the driveway, doesn’t fight the house.”

The picture above shows our lake house before we remodeled the exterior and move the shed back towards the house.
Here’s what we landed on for our 10×12 storage shed design that actually looks planned:
- Size: 10×12 shed (big enough for lawn equipment, tools, and seasonal overflow, small enough to build in a weekend with two people)
- Siding: White vinyl, to coordinate with the lake house’s white board and batten
- Windows: Simple white windows that echo the house windows
- Shutters: The same DIY cedar-toned shutters we used on the house
- Door: A house-style exterior door instead of a basic shed door
- Roof: Shingles that match the home’s roof
What most people miss here is that you don’t need expensive materials to make a shed look high-end. You just need consistency. Color, texture, and shape repeating from your main house to your shed do most of the heavy lifting.
Visit this post, exterior lake house makeover with shutters to see more details.
Step-by-Step: How to Build a Shed in a Weekend
Here is the real-world order we tackled each part so the weekend didn’t go off the rails.
1. Demo Day: Removing the Old Shed
We started by taking down the collapsing shed. That meant pulling off the failing roof, disassembling unsafe wall sections, clearing out any salvageable materials (spoiler: not much), and hauling debris out of the way.
If you’re planning your own shed build, protect yourself here: gloves, eye protection, and a healthy respect for old nails.
2. Shifting the Location
Instead of rebuilding in the exact same spot, we nudged the new shed footprint slightly back. That one small move gave us more driveway space out front (which matters when you’re parking cars, boats, kids’ stuff, and all the extras that come with lake life).

If your yard always feels tight, ask yourself: “What if the shed moved two feet back or sideways?” Tiny location shifts can improve parking, open up sightlines to the yard or water, and make the whole space feel more intentional.
3. Building the 10×12 Storage Shed Base
Once the old shed was gone and we’d settled on the new spot, we built the base for our 10×12 storage shed.

This is the part where you want level, solid, and square. Not “close enough.” The base is what keeps doors from sticking, roofs from twisting, and shelves from feeling wonky later.

We prepped the ground, built the 10×12 platform, and checked square (again) before moving on.
4. Framing and Raising the Walls
With the base done, we framed the wall sections and raised them into place.

Walls went up in this order: back wall, side walls, front wall with the door opening. We tied everything together, checked for plumb, and braced as needed.

Common place people go wrong here? Window and door placement. Think about how the door swings with your driveway or path, where you’ll want light inside, and where shelving will go so you don’t block windows later.
5. Building the Roof
Next up: roof.

We constructed the roof framing, installed sheathing, and added shingles to match the house.
Two big things here: check your weekend forecast (roofing in the rain is a hard nope), and have two people for safety.

Matching roof shingles to the house went a long way toward making the shed look like a mini extension, not a random add-on.
6. Siding, Windows, Shutters, and Door
With the structure sound and the roof on, we moved to the fun part — watching it start to look finished.

We installed the white vinyl siding, popped in the white windows, hung the same cedar-look shutters as the house, and installed a regular house-style exterior door.

This is where the “match the house” plan kicked in. Even on a DIY budget, repeating your home’s main design choices makes everything look more pulled together.
7. Inside: Shelves, Storage, and a Solar Light
Inside, we kept things simple and functional: basic wood wall shelves sized for lawn equipment and storage bins, open storage so you can see everything at a glance, and enough floor space to roll in the mower and larger tools.
The MVP detail? A solar-powered interior light.
Instead of running electrical, we added a small solar light so you can actually find things at night. Perfect for late-night tool grabs, early-morning lake chores, and not tripping over the weed whacker in the dark.
No wiring, no trenching, no calling an electrician.

8. The Exterior Ramp
We added a small ramp outside the door so the mower and tools can roll in easily. If you’ve ever tried to bump a heavy mower over a threshold, you know why this matters.
9. Final Paint and Trim Touches
Last step: all the little things that take it from “yep, that’s a shed” to “okay, that actually looks cute.”
We touched up trim, made sure everything was sealed and weather-tight, and checked how it looked from the street and driveway.

Because the siding, roof, windows, and shutters already echoed the main house, the final effect was exactly what we wanted: a functional workhorse that still looks good in photos.

What We’d Absolutely Do Again (And What We’d Skip)
Based on this build and a whole lot of other DIY projects, here’s what we’d repeat in a heartbeat:
- Shift the shed location for better driveway flow instead of mindlessly rebuilding in the same footprint
- Match the house exterior with siding color, window style, shutters, and shingles
- Keep the interior simple — shelves, open storage, and room to roll
- Use a solar light inside instead of overcomplicating the electrical
- Add a small ramp so heavy stuff actually makes it inside without a full workout
What we’d skip? Trying to rescue an old, unsafe structure just because it’s already there, and over-designing the exterior with details that look great online but add hours (and dollars) in real life.
If You’re Planning Your Own Shed Build
Screenshot the parts that matter to you:
- The idea of shifting the location to free up driveway or yard space
- Matching siding, windows, shutters, and roof to your house
- Keeping the inside focused on what you actually store, not what looks cute online
- Adding a solar light and simple ramp for everyday sanity
Start there. You can always layer on decor later. But getting the structure, layout, and core details right? That’s what makes a shed you actually love using, not just looking at from the deck!

Meet Jessica
What started as a hobby, Jessica’s blog now has millions of people visit yearly and while many of the projects and posts look and sound perfect, life hasn’t always been easy. Read Jessica’s story and how overcoming death, divorce and dementia was one of her biggest life lessons to date.
Come Enjoy a Stay at our Lake House
Our newly renovated waterfront lake house retreat with 1500 SF (7 beds), 3BR, 2BA, open concept living room + kitchen + lower level w/ arcade game is the perfect destination for your next getaway.